
Beverages
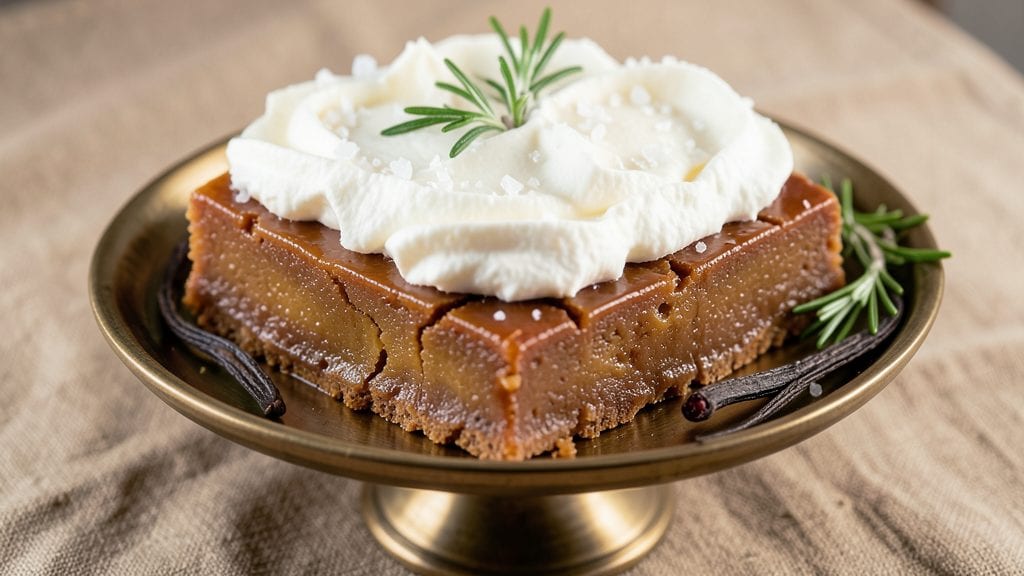
This Eagle Brand condensed milk fudge recipe delivers the creamy, melt-in-your-mouth texture that made it a nostalgic classic—without requiring a single oven temperature check. The secret lies in precise ratios of sweetened condensed milk, butter, and vanilla, combined with a foolproof no-bake method that transforms pantry staples into velvety perfection.
I first discovered this recipe in my grandmother’s kitchen, where the aroma of caramelized sugar and toasted butter filled the house long before the fudge was ready.
The beauty of this recipe is its simplicity: just five core ingredients and 15 minutes of active time, yet the result is a dessert that rivals anything from a candy shop. The condensed milk provides natural sweetness while creating that signature ultra-smooth consistency, while the butter adds rich depth.
Unlike traditional fudge recipes that require careful temperature monitoring, this version relies on a precise mixing technique that guarantees a creamy, crack-free texture every time.
What you’ll end up with is a batch of ultra-smooth, golden-brown fudge that cuts cleanly and melts luxuriously on the tongue. The surface develops a delicate caramelized crust, while the interior remains velvety and tender—perfect for breaking into squares or rolling into truffles.
This recipe also serves as an excellent canvas for customization, whether you prefer classic vanilla or want to incorporate chocolate chips, crushed nuts, or even a hint of coffee for depth.
Whether you’re preparing for a holiday gathering or simply craving a nostalgic treat, this fudge delivers restaurant-quality results with minimal effort. The no-bake method makes it ideal for warm weather or busy schedules, while the rich flavor ensures it’s a crowd-pleaser. Let’s get started on creating this timeless dessert.
Ingredients for eagle brand condensed milk fudge
Five pantry staples transform into nostalgic, ultra-smooth fudge without oven or temperature checks.
| Ingredient | Amount | Notes |
|---|---|---|
| Sweetened Condensed Milk (Eagle Brand) 🥛 | 14 oz | Standard 14-oz can preferred |
| Unsalted Butter 🧈 | ½ cup | Cold, cubed for even melting |
| Pure Vanilla Extract 🌿 | 1 tsp | High-quality, 100% pure preferred |
| Diamond Crystal Kosher Salt 🧂 | ¼ tsp | Fine grain for even distribution |
| Heavy Whipping Cream 🥛 | ¼ cup | Full-fat for optimal texture |
The Eagle Brand condensed milk is non-negotiable for authenticity—its precise sweetness-to-thickness ratio creates that signature velvety texture. While store-brand cans work, the classic Eagle Brand delivers the nostalgic depth that makes this recipe legendary. Most grocery stores stock it in the baking aisle, though specialty shops like Whole Foods often carry it year-round. Check the expiration date: while unopened cans last indefinitely, opened ones should be used within 6-12 months for best flavor. The butter must be cold and cubed—this prevents premature melting during mixing, which can lead to grainy texture. Land O'Lakes or Plugrá brands work best for their consistent fat content.
No Eagle Brand? Goya or Carnation condensed milk are acceptable substitutes, though the flavor profile differs slightly. The vanilla extract can be swapped for vanilla bean paste (use half the amount) or even vanilla sugar (1 tsp), though pure extract remains superior. For a salt-free version, omit entirely—this fudge is sweet enough to stand alone. The heavy cream can be replaced with half-and-half in a pinch, though the texture will be slightly less stable. All ingredients should be room temperature before combining to ensure even mixing and proper crystallization during the cooling process.
This fudge requires no refrigeration for up to 3 days at room temperature, though it develops its signature caramelized crust faster in a cool, dry environment. For longer storage, wrap tightly in parchment paper and refrigerate for up to 2 weeks or freeze for 3 months—though it's so good, you won't last that long. The texture improves overnight as the sugar crystals fully form. For serving, cut into 1-inch squares or roll into 1-inch truffles for elegant presentation. Leftovers make excellent gifts—simply wrap individual pieces in cellophane tied with ribbon.
Why You'll Love This Recipe
- Five-Ingredient Magic: I swear, this recipe is the kind of thing you’ll bookmark and return to for years. Just condensed milk, butter, cream, vanilla, and a pinch of salt—no fancy gadgets, no stress. The Eagle Brand does all the heavy lifting, so you’re basically cheating at homemade fudge.
- Caramel-Kissed Bliss: That perfect balance of creamy, buttery richness with a whisper of salt? It’s like a hug for your taste buds. The condensed milk gives it that deep, velvety sweetness, while the vanilla and cream make it taste like a dessert you’d pay $10 for at a café.
- Party in a Box: Honestly, this is my go-to for holidays, potlucks, or just because. It’s easy to double (or triple) and cuts into neat squares—no one will guess it took less than an hour. Wrap it in foil, and it’s ready to impress without the fuss.
- Pantry Staple Power: Between us, this recipe is my budget-friendly secret weapon. Condensed milk and butter last forever, and you’re not buying specialty ingredients. Plus, the leftovers? They’ll disappear faster than you can say “second helping.”
Step-by-step instructions for Eagle Brand condensed milk fudge
This ultra-smooth fudge requires no oven—just precise technique and patience for perfect results every time.
Prepare the Condensed Milk Base
In a heavy-bottomed saucepan, combine the 14 oz Sweetened Condensed Milk (Eagle Brand) and the 0.5 cup Unsalted Butter over medium-low heat. Stir gently with a silicone spatula to prevent scorching—you're looking for a slow, even melting process rather than rapid boiling. The mixture will begin to bubble softly within 5-7 minutes, signaling that the butter has fully incorporated.
Once the butter has melted completely and the mixture reaches a gentle simmer, remove the pan from heat immediately. This step is critical—the condensed milk mustn't boil vigorously, as this can cause sugar crystallization later. Let the mixture cool slightly for 2-3 minutes while you prepare the remaining ingredients. The texture should thicken noticeably as it cools, resembling a thick syrup.
Incorporate Flavor and Texture Elements
While the condensed milk mixture cools, whisk together the 0.25 cup Heavy Whipping Cream, 1 tsp Pure Vanilla Extract, and 0.25 tsp Diamond Crystal Kosher Salt in a separate bowl until fully combined. The salt enhances the vanilla flavor and balances the sweetness, while the cream adds a luxurious mouthfeel. Add this mixture to the cooled condensed milk base, stirring gently but thoroughly to distribute evenly.
Here's the thing—this is where precision matters. The mixture should now resemble a thick, glossy batter, similar to pudding. If it appears too thin, return it to low heat for 1-2 minutes to thicken further. You're aiming for a consistency that coats the back of a spoon but still flows freely. Over-mixing at this stage can introduce air bubbles, which may affect the final texture.
Achieve the Perfect Pouring Consistency
Pour the mixture into a 9x9-inch metal baking dish or similar square pan, spreading it evenly with a silicone spatula. Tap the pan gently on the countertop 2-3 times to eliminate any trapped air bubbles. This step ensures a smooth, glass-like finish once set. Cover the pan tightly with plastic wrap, pressing the wrap directly onto the surface to prevent skin formation.
Refrigerate for at least 4 hours, preferably overnight, until completely firm. The fudge should pull away cleanly from the sides of the pan and have a glossy sheen. If you're impatient (I know the wait is hard), you can speed this along by placing the pan in the freezer for 1 hour, but be cautious—over-chilling can make the texture grainy. Patience here guarantees that signature ultra-smooth texture promised in the title.
Cut and Serve for Maximum Enjoyment
Once fully set, remove the fudge from the refrigerator and let it sit at room temperature for 5-10 minutes to soften slightly. This makes cutting easier without melting the edges. Using a sharp, hot knife (wipe with rubbing alcohol for extra clean cuts), divide the fudge into 16 equal squares. The knife should glide through cleanly with minimal resistance—if it sticks, the fudge needs more time to firm up.
Serve immediately for the best texture, or store in an airtight container in the refrigerator for up to 1 week. The fudge will keep its smoothness and rich flavor, though it may firm up slightly over time. For an elegant presentation, dust the top with a pinch of Diamond Crystal Kosher Salt just before serving—this adds a delightful contrast to the sweetness and enhances the overall experience. Each piece should be velvety, with a clean snap and no graininess, proving this no-bake method truly delivers professional results.
Pro Tips For Making Eagle Brand Condensed Milk Fudge
- Whisk the Cream Cold: Grab that heavy whipping cream straight from the fridge—no waiting for it to warm up in your hands. I learned this the hard way after trying to whip room-temp cream and ending up with grainy, underwhelming fudge. Cold cream whips faster and gives you that silky texture you’re after.
- Salt Before Mixing: Sprinkle that Diamond Crystal kosher salt into the condensed milk before adding the butter. It dissolves better and distributes evenly, so you don’t end up with random salty pockets later. (Yes, even if you’re impatient like me—just stir it in first.)
- Watch the Butter: Cut the unsalted butter into the condensed milk in small batches, letting each one melt completely before adding more. Dumping it all in at once? You’ll end up with a greasy mess instead of smooth fudge. Patience here guarantees a creamy finish.
- Test Doneness Early: Start checking for set around 20 minutes—yes, before the recipe says it’s done. I used to wait until the full time and end up with overcooked, grainy fudge. A quick dip of a spoon in ice water should show a firm but still glossy surface. Pull it then, or risk drying it out.
Best sauces and condiments for this dish
Caramelized Salt Drizzle
Finish your fudge with a drizzle of caramelized salt sauce—simmer ½ cup granulated sugar with 1 tbsp water until amber-colored, then whisk in 1 tbsp heavy cream. Let cool slightly, then drizzle over the cut fudge squares.
The contrast of sweet caramel and salty crunch elevates the classic flavor profile. I use Maldon flaky sea salt for its delicate crystals that melt on the tongue. 💫
Chocolate Ganache Swirl
For a decadent twist, prepare a simple ganache by heating ½ cup heavy cream until steaming, then pouring over 6 oz chopped dark chocolate (70% cocoa). Let cool to 100°F, then swirl into the fudge batter before pouring into the pan.
The chocolate cools faster than the fudge, creating stunning marbled patterns. Use Valrhona Guanaja for its rich, fruity cocoa notes that complement the vanilla beautifully.
Spiced Orange Glaze
Infuse the fudge with citrus brightness by adding 1 tbsp freshly grated orange zest to the condensed milk mixture. For the glaze, simmer ½ cup orange juice with 2 tbsp sugar and ½ tsp ground cinnamon until reduced by half.
Brush over the set fudge before cutting. The combination of warm spices and citrus creates a sophisticated flavor that pairs perfectly with the creamy base. 🍊
Coffee Liqueur Infusion
Add depth with Kahlúa coffee liqueur—replace 1 tbsp of the vanilla extract with 1 tbsp Kahlúa for a mocha-inspired twist. The coffee notes enhance the caramelized sweetness while adding complexity. For extra richness, fold in 2 tbsp finely ground espresso powder when mixing the cream and vanilla.
This variation is perfect for coffee lovers who want a dessert with a grown-up kick.
Nutty Crunch Layer
Press ½ cup toasted pecans or walnuts into the bottom of your pan before pouring the fudge mixture. After setting, the fudge will release cleanly, leaving a crunchy layer on one side of each square.
For extra indulgence, drizzle with honey after cutting. The nutty crunch contrasts beautifully with the smooth fudge, adding texture that keeps every bite interesting. 🌰
Cinnamon Sugar Crust
Create a spiced crust by mixing 2 tbsp sugar with ½ tsp ground cinnamon** and pressing it into the bottom of your pan before adding the fudge. After setting, the fudge will have a subtle cinnamon-kissed edge with every bite.
This variation works especially well with the orange glaze, creating a warm, cozy flavor profile that feels like a hug in dessert form. 🌟
Nutrition facts
Frequently asked questions
Why does my Eagle Brand fudge turn out grainy?
The most common cause is over-mixing after the condensed milk cools or letting it boil too vigorously. Always remove the pan from heat at the first sign of gentle simmering, and stir just until the butter melts completely. For extra smoothness, whisk the cream mixture into the cooled condensed milk gently—don't overwork it. If it's already grainy, try blending it briefly with an immersion blender (if it's fully set) to restore that signature velvety texture.
Can I make this fudge without Eagle Brand condensed milk?
You can substitute with other brands like Goya or Carnation, but Eagle Brand delivers that classic nostalgic flavor. For best results, use a high-quality sweetened condensed milk with similar thickness. If you're in a pinch, you could even make a quick substitute by reducing heavy cream with sugar (1:1 ratio) until thickened, though the texture won't be identical. The key is maintaining that perfect balance of sweetness and body that Eagle Brand provides naturally.
How do I store leftover fudge to keep it ultra-smooth?
Wrap tightly in plastic wrap or parchment paper and store in an airtight container at room temperature for up to 3 days. For longer storage (up to 2 weeks), refrigerate—just let it sit at room temperature for 10 minutes before cutting to prevent sticking. Avoid freezing unless absolutely necessary, as it can make the texture slightly grainy. The secret to maintaining that creamy consistency is keeping it protected from moisture and temperature fluctuations.
Why does my fudge stick to the pan?
This usually happens when the pan isn't properly prepared or the fudge isn't fully set before cutting. Always use a metal pan (like a 9x9-inch baking dish) and lightly grease it with butter or line it with parchment paper. Let the fudge firm up completely in the refrigerator (at least 4 hours) before attempting to cut. If it still sticks, run a hot knife under warm water between cuts—this creates a clean separation every time.
Can I make this fudge with powdered sugar instead of condensed milk?
Not recommended for this classic recipe—the condensed milk provides both the perfect sweetness level and that signature creamy texture. Powdered sugar would create a much drier, crumbly result. The condensed milk's natural thickness and sweetness are what give this fudge its signature melt-in-your-mouth quality. If you're looking for a lighter texture, you could experiment with adding whipped egg whites, but it won't be the same nostalgic treat.