
Desserts
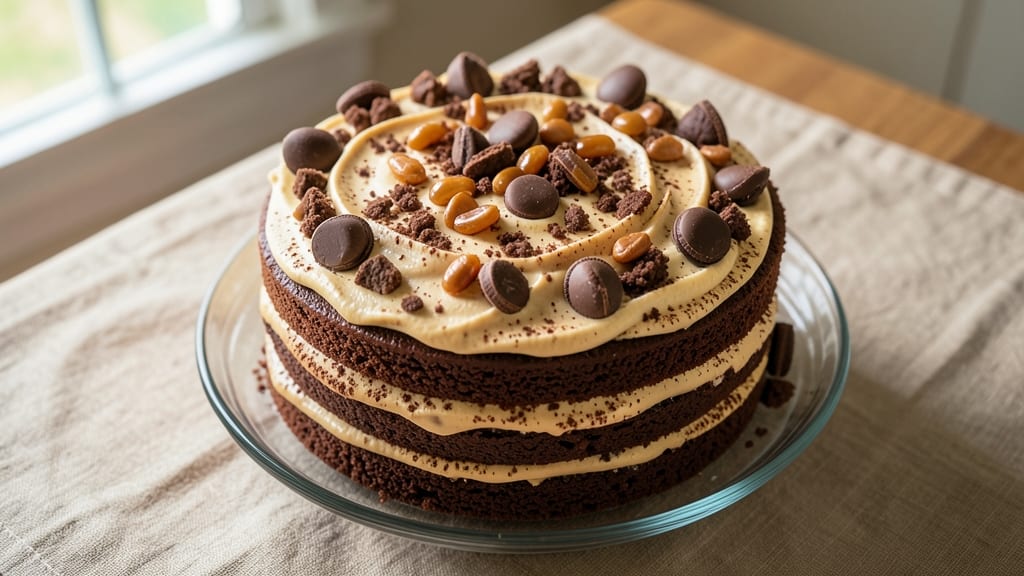
This Reese's Earthquake Cake recipe delivers the ultimate dessert experience—rich fudgy layers, a crunchy peanut butter surprise, and a texture that lives up to its name. After perfecting the balance between dense chocolate cake and Reese's filling, I've created a recipe that's both impressive and foolproof for home bakers.
The secret lies in precise layering and proper chilling to prevent cracks, ensuring every slice delivers that signature earthquake effect.
The cake itself is a decadent chocolate fudgy texture that's almost brownie-like, while the Reese's peanut butter pieces add a satisfying crunch that contrasts beautifully with the soft layers.
This isn't just another chocolate cake—it's an experience that starts with the first bite of rich, moist cake and ends with the revelation of peanut butter chunks in every forkful. The combination of warm spices and peanut butter creates a flavor profile that's impossible to resist.
What makes this recipe special is how it transforms a simple dessert into something extraordinary with just a few key techniques. The cake layers are baked to perfect doneness, then carefully assembled with Reese's pieces and peanut butter frosting for that signature crunch.
Proper chilling between layers ensures clean slices and prevents the classic "earthquake" from happening too soon—you want your guests to experience the surprise, not the collapse.
Whether you're baking for a celebration or just craving a decadent treat, this cake delivers restaurant-quality results with minimal effort. The recipe includes troubleshooting tips to help you achieve that perfect texture every time, so you can focus on enjoying the process.
Let's get started on creating a dessert that's sure to become your new favorite.
Ingredients for reese's earthquake cake
Rich chocolate layers, peanut butter surprises, and a crunch that lives up to the name.
| Ingredient | Amount | Notes |
|---|---|---|
| All-Purpose Flour 🌾 | 2 ½ cups | Sifted for fluffy layers |
| Granulated Sugar 🍚 | 2 ¼ cups | White or light brown |
| Unsalted Butter 🧈 | 1 ½ cups | Room temperature, full-fat |
| Reese's Peanut Butter Cups 🍫 | 16 whole | Chopped into small pieces |
| Large Eggs 🥚 | 4 whole | Room temperature |
| Baking Soda 🧂 | 1 tsp | Freshly measured |
| Vanilla Extract 🍯 | 2 tsp | Pure, high-quality |
| Cocoa Powder 🍫 | ¾ cup | Dutch-processed preferred |
| Salt 🧂 | ½ tsp | Fine sea salt |
| Peanut Butter Frosting 🥜 | 2 cups | Store-bought or homemade |
| Powdered Sugar 🍚 | 4 cups | For frosting |
| Heavy Cream 🥛 | ½ cup | Cold, for frosting |
| Ground Cinnamon 🌿 | 1 tsp | For dusting layers |
The Reese's pieces are the star—grab the mini cups for perfect-sized chunks. Trader Joe's or Walmart usually carry them in bulk, but any store with the candy aisle will work. The butter? Use full-fat, room temperature—this isn't the time for low-fat shortcuts. For the flour, King Arthur or Gold Medal brands are my go-tos—they bake up fluffier. The cocoa powder makes all the difference: Dutch-processed (like Hershey's Special Dark) gives that smooth, rich chocolate flavor. If you can't find mini Reese's, chop regular ones—but they won't be as evenly distributed.
No Reese's? Crushed peanut butter cups or chopped peanuts work in a pinch, but the magic is in those little cups. Short on powdered sugar? Granulated sugar blended into a fine powder in a food processor does the trick. The frosting can be store-bought (like Smucker's or Jif), but homemade tastes 10x better—just mix powdered sugar, peanut butter, and heavy cream until smooth. The cinnamon dusting? Optional but worth it—it adds a warm contrast to the peanut butter. If you're nervous about the cake being too dense, whisk the eggs extra well to incorporate air.
This cake needs time to chill—don't skip it! After baking, let layers cool completely, then refrigerate for at least 2 hours before assembling. The frosting should be thick but spreadable—if it's too runny, chill it 10 minutes. Store leftovers in the fridge for up to 5 days, covered tightly. Freeze layers (unfrosted) for up to 3 months—just thaw overnight before assembling. Pro tip: Use parchment paper between layers to prevent sticking, and wrap the whole cake in plastic wrap for a cleaner slice.
Why You'll Love This Recipe
- No-Fuss Layers: I swear, the only "hard" part is cracking eggs—everything else is mix, bake, repeat. No fancy techniques, just a simple cake batter and crushed peanut butter cups folded in like a dream.
- Peanut Butter Overload: That first bite? Pure chocolate-peanut-butter euphoria. The cake’s got a tender crumb, but the Reese’s chunks melt into gooey pockets—like eating a dessert and a snack at once.
- Party in a Box: Between us, this cake is my go-to for birthdays, potlucks, or just because. The layers look impressive (even if they’re slightly messy), and everyone asks for seconds—no stress, just smiles.
- Budget-Friendly Indulgence: I make this for under $10 and it feeds a crowd. The peanut butter cups add richness without breaking the bank, and leftovers? They vanish faster than I can say "another slice."
Step-by-step instructions for Reese's earthquake cake
Here's how to create the ultimate Reese's Earthquake Cake with rich fudgy layers and a crunchy surprise.
Prepare the Chocolate Cake Layers
Preheat your oven to 350°F and grease two 9-inch round cake pans, lining the bottoms with parchment paper for easy removal. In a large mixing bowl, cream together the 1.5 cups unsalted butter and 2.25 cups granulated sugar on medium speed until light and fluffy, about 3-4 minutes. This step is crucial—it incorporates air for a tender crumb.
Add the 4 whole large eggs, one at a time, mixing well after each addition. Then, whisk in the 2 teaspoons vanilla extract and 0.75 cup cocoa powder. In a separate bowl, sift together the 2.5 cups all-purpose flour, 1 teaspoon baking soda, and 0.5 teaspoon salt. Gradually add the dry ingredients to the wet mixture, mixing just until combined. The batter will be thick and fudgy—this is exactly what you want!
Bake and Assemble the Layers
Divide the batter evenly between the two prepared cake pans. Bake for 30-35 minutes, or until a toothpick inserted into the center comes out clean. Allow the layers to cool in the pans for 10 minutes, then transfer them to a wire rack to cool completely. This cooling step is essential—it prevents the frosting from melting and ensures clean slices.
Once fully cooled, level the tops of the layers if needed. Spread 1 cup peanut butter frosting evenly over the first layer, then place the second layer on top. Spread the remaining 1 cup peanut butter frosting over the top and sides of the cake, creating a smooth base for the final surprise.
Create the Crunchy Reese's Surprise
Chop the 16 whole Reese's peanut butter cups into small, even pieces—about ¼-inch cubes. Spread these evenly over the peanut butter frosting, pressing them lightly into the surface. This step is where the magic happens—those crunchy pieces will become the "earthquake" surprise when sliced!
Chill the cake in the refrigerator for at least 2 hours to allow the frosting to set. This step ensures clean slices and prevents the Reese's pieces from shifting. While it chills, prepare the final frosting by mixing 4 cups powdered sugar, 0.5 cup heavy cream, and 1 teaspoon ground cinnamon until smooth and spreadable.
Frost and Decorate for Maximum Wow
Once the cake is fully chilled, spread the cinnamon-sugar frosting over the top and sides, creating a smooth, even layer. Use a spatula to press the frosting into the crevices, ensuring every Reese's piece is covered. Dust the top lightly with additional ground cinnamon for a beautiful finish. This final touch adds a subtle warmth that complements the rich chocolate and peanut butter flavors.
Slice the cake into 12 even portions and serve immediately. The first bite will reveal the crunchy Reese's surprise hidden beneath the frosting—just like an earthquake shaking up your dessert experience! Store any leftovers in the refrigerator for up to 3 days, though I doubt they'll last that long.
Pro Tips For Making Reese'S Earthquake Cake
- CHILL THE BUTTER FIRST: This isn’t just about softening—it’s about room temperature (about 65°F). Cold butter from the fridge will make your cake dense, and melted butter will turn it greasy. Cut the butter into ½-inch cubes, let them sit for 30-45 minutes until they’re pliable but not shiny, then mix. Trust me, your crumb structure will thank you.
- CRUSH PEANUT BUTTER CUPS: Whole Reese’s cups won’t melt evenly—they’ll sink like rocks or burn on top. Pulse them in a food processor for 10-15 seconds until they’re chunky but broken, or chop them by hand with a knife. This guarantees a smooth, gooey layer instead of a surprise texture.
- BAKE UNTIL THE EDGE DROPS: The recipe might say "until a toothpick comes out clean," but this cake’s magic is in the slightly underbaked center. Pull it out when the edges pull away from the pan and the center still jiggles like Jell-O. It’ll set as it cools—overbaking turns it dry.
- MIX DRY INGREDIENTS FIRST: Sift the flour and cocoa powder together before adding wet ingredients. This prevents lumps and ensures even distribution, especially since this recipe relies on the peanut butter cups’ richness to balance the flour’s heaviness. I learned this the hard way—lumpy cake = sad cake.
Serving suggestions for this dish
Presentation Plating
Serve this cake on a chocolate-dusted cake stand or wooden board for rustic charm. Arrange slices on a white marble slab to make the peanut butter cups pop against the neutral background.
I like to garnish each slice with a sprinkle of crushed peanuts and a drizzle of melted chocolate for extra flair. For a dramatic reveal, cut the cake at the table—watch your guests' faces light up when the Reese's surprise appears! 🌟
Portion Perfectly
Use a serrated knife heated in hot water for 3-4 seconds before each slice—this ensures clean cuts through the dense layers. For even portions, mark the cake with a pencil and ruler before cutting.
Each serving should be about 2 inches wide—perfect for sharing or solo indulgence. Pro tip: Serve with a small scoop of vanilla ice cream to balance the richness.
Dessert Pairings
Pair with a bold coffee like a dark roast or espresso to cut through the sweetness. For a non-coffee option, try chilled peppermint tea—the cool mint refreshes your palate. I also love serving this cake with a glass of cold milk for a nostalgic touch.
Avoid overly sweet drinks like caramel lattes, which can clash with the peanut butter intensity. 🍫
Party Presentation
For gatherings, stack slices on a tiered stand with a peanut butter drizzle cascading down the sides. Add mini Reese's cups as edible decor around the base.
Label each slice with toothpick flags for a fun, interactive touch. Keep the cake refrigerated until serving to maintain crispness—guests will love the dramatic reveal! 🎉
Leftovers Strategy
Store slices in an airtight container with parchment paper between layers to prevent sogginess. Refrigerate for up to 5 days or freeze for 2 months. To reheat, warm in the microwave for 10-15 seconds—just enough to soften the frosting without melting the Reese's pieces.
Serve cold leftovers as dessert or breakfast with a cup of coffee! ❄️
Nutrition facts
Frequently asked questions
Why does this cake have peanut butter pieces inside?
The Reese's pieces create the signature "earthquake" effect when sliced—each bite reveals a crunchy surprise! This texture contrast makes the cake unforgettable, balancing the rich chocolate layers with peanut butter's nutty crunch. The mini cups distribute evenly for maximum surprise in every forkful.
Can I make this cake without Reese's Peanut Butter Cups?
Yes! Use chopped regular Reese's cups or substitute with crushed peanut butter cups or peanut butter chips. For a nutty alternative, try chopped peanuts or almonds—but the magic comes from the chocolate-peanut butter combo. Just adjust the size to match the mini cup pieces in the recipe.
How do I prevent the cake from cracking?
Cracks often happen from overmixing or improper chilling. Mix the batter just until combined (no streaks), and let layers cool completely before frosting. Chill the assembled cake for at least 2 hours—this sets the frosting and prevents structural stress. For extra stability, use a cake leveler to create even tops.
Is this cake gluten-free or vegan?
This recipe isn't naturally gluten-free (uses all-purpose flour) or vegan (contains butter and eggs). For adaptations: swap flour for a 1:1 gluten-free blend, use vegan butter, and replace eggs with flax eggs (1 tbsp ground flax + 3 tbsp water per egg). The texture may vary slightly, but the technique remains the same!
Can I bake this cake in a different pan size?
For best results, stick to 9-inch round pans—they create the ideal layer thickness. If using 8-inch pans, reduce baking time by 5 minutes and adjust the frosting quantity downward by 20%**. Larger pans (like 10-inch) may require longer baking and extra frosting, but the "earthquake" effect will still work!