Side Dishes
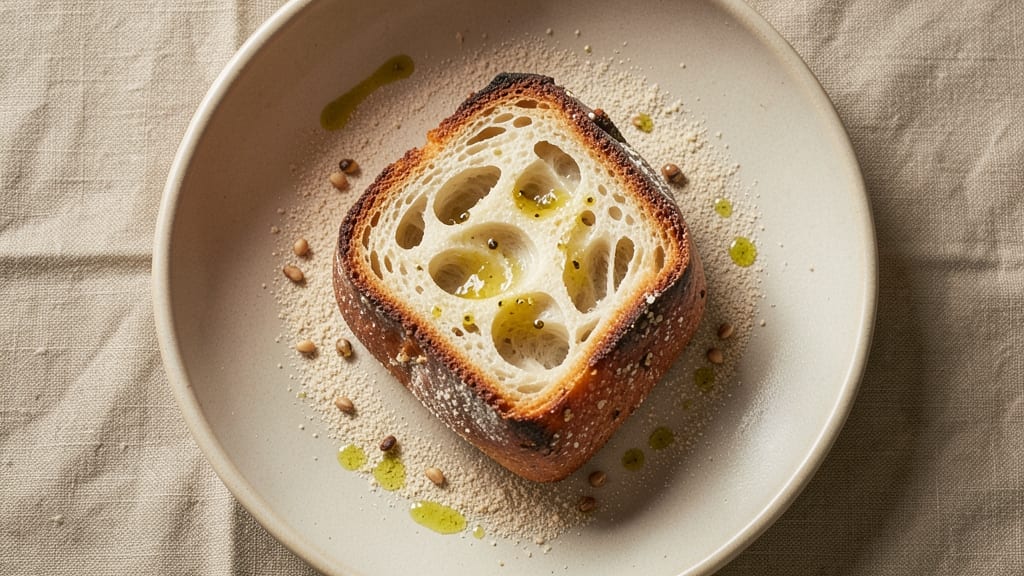
This artesano bread copycat recipe delivers the same crusty, airy loaf you'd find in an Italian bakery—no-knead method included. I've spent years perfecting this technique to replicate the signature texture and flavor, using simple ingredients and traditional methods.
The key lies in precise fermentation and baking techniques that create that signature open crumb and crispy crust.
The beauty of this recipe is its simplicity—just flour, water, yeast, and salt, yet it produces a loaf with restaurant-quality results. The no-knead approach saves time while developing deep flavor through slow fermentation.
With a Dutch oven and proper proofing, you'll achieve that golden, shatteringly crisp crust and an interior filled with air pockets that make every bite satisfying.
What makes this recipe truly special is the authentic Italian technique adapted for home bakers. The dough ferments overnight, allowing flavors to develop fully, while baking in a Dutch oven traps steam for that perfect crust.
By the time you pull it from the oven, you'll have a loaf that looks and tastes like it came from a traditional Italian bakery.
Perfect for serving with soups, dipping in olive oil, or pairing with your favorite meals. This recipe is designed to be foolproof, ensuring consistent results every time. Let's get started on creating your own artisanal loaf at home!
Ingredients for artesano bread copycat
Four simple ingredients transform into restaurant-quality artisanal loaf through precise technique and patience.
| Ingredient | Amount | Notes |
|---|---|---|
| Bread Flour 🌾 | 4 cups | High-protein for structure and elasticity |
| Active Dry Yeast 🍞 | ¼ oz | Freshly opened for optimal fermentation |
| Diamond Crystal Kosher Salt 🧂 | 1 ½ tsp | Fine grain for even distribution |
| Cold Filtered Water 💧 | 2 ½ cups | Room temperature within 10 minutes |
| Extra-Virgin Olive Oil 🫒 | 2 tbsp | For dough coating and crust enhancement |
| Cornmeal 🌽 | ½ cup | For Dutch oven dusting |
| Ice Cubes ❄️ | 1 cup | For dough temperature control |
| Coarse Sea Salt 🧂 | 1 tsp | For final crust scoring |
| Honey 🍯 | 1 tbsp | Optional for subtle sweetness |
The bread flour is non-negotiable—King Arthur or Caputo Tipo 00 deliver that signature open crumb structure. Bulk bins at Whole Foods or specialty Italian markets offer the best quality. Active dry yeast must be freshly opened; check expiration dates and store in the freezer for extended shelf life. The Diamond Crystal kosher salt provides consistent results—avoid table salt as its finer grain can over-salt. For the water, filtered is ideal, but tap water works if free of impurities. The extra-virgin olive oil should be fruity and peppery, like Colavita or Bertolli, to enhance crust flavor without overpowering.
No bread flour? All-purpose flour plus 1 tbsp vital wheat gluten mimics high-protein content. Substituting active dry yeast for instant yeast requires no proofing time—just mix directly into dough. For salt, Maldon flaky sea salt adds visual appeal to crust scoring. The honey can be swapped for maple syrup or agave>—any liquid sweetener works equally well. If your kitchen lacks a Dutch oven, a heavy oven-safe pot with a lid creates similar steam retention. For the cornmeal, fine-ground grits> work as a substitute, though texture may vary slightly.
Ferment the dough overnight in the fridge for optimal flavor development. Store unused flour in airtight containers> away from heat sources for up to 6 months>. The yeast should be kept in its original packaging in the freezer for up to 2 years>. Once baked, the loaf maintains freshness for 3-4 days> at room temperature, wrapped in a clean kitchen towel. For longer storage, freeze slices in a ziplock bag> for up to 3 months>. Reheat in a 350°F oven for 5 minutes> to restore crispness.
Why You'll Love This Recipe
- I’ve used this for everything: toast in the morning, sandwiches for lunch, and even as a base for garlic bread at dinner. It’s the one loaf that does it all without feeling like a chore. (Yes, even on a Tuesday night.)
- Five-Ingredient Magic: This recipe nails the artisanal vibe with just flour, yeast, salt, water, and olive oil—no fancy add-ins needed. Honestly, the simplicity is what makes it foolproof: mix, knead, let it rise, and bake. That’s it. No overcomplicating, no failed experiments.
- Crispy-Chewy Crunch: The high-protein bread flour gives you that perfect crust—golden and shatteringly crisp—while the olive oil keeps the interior tender. Between us, that first bite with warm butter? It’s the kind of bread that makes you pause mid-slice just to savor it.
- Weeknight Workhorse: I’ve used this for everything: toast in the morning, sandwiches for lunch, and even as a base for garlic bread at dinner. It’s the one loaf that does it all without feeling like a chore. (Yes, even on a Tuesday night.)
Step-by-step instructions for artesano bread copycat recipe
Master this no-knead technique for an authentic Italian-style loaf with crisp crust and open crumb.
Activate the Yeast and Mix the Dough
In a large mixing bowl, combine the 4 cups bread flour and 1.5 teaspoons diamond crystal kosher salt. Make a well in the center and add the 0.25 ounce active dry yeast. Pour in the 2.5 cups cold filtered water and 1 tablespoon honey (if using), then whisk vigorously until the yeast dissolves completely and the mixture forms a shaggy dough.
Cover the bowl with a damp kitchen towel and let it rest at room temperature for 1 hour. You'll notice the dough begin to bubble and expand slightly—this indicates active fermentation. The cold water prevents overproofing while allowing the yeast to develop flavor. If the dough doesn't show signs of activity after 1 hour, let it rest another 15 minutes before proceeding.
Incorporate Olive Oil and Ice for Dough Control
After the initial rest, add the 2 tablespoons extra-virgin olive oil to the dough and mix thoroughly with your hands until fully incorporated. The oil will coat the dough, contributing to a tender crumb and golden crust. Add the 1 cup ice cubes one handful at a time, working them into the dough to lower its temperature and slow fermentation.
Once the ice is fully melted and absorbed, the dough should be smooth and slightly sticky but not wet. If it's too sticky, add 1 tablespoon bread flour at a time until it reaches a workable consistency. This step is critical for achieving the bread's signature open crumb structure. Cover the bowl again and let the dough rest for 12 hours at room temperature, or overnight in the refrigerator for enhanced flavor development.
Shape and Prepare the Dough for Baking
Lightly flour a clean work surface and transfer the rested dough onto it. Gently shape the dough into a round boule by pulling the edges toward the center, creating surface tension. Rotate the dough as you work to ensure even tension. The boule should be smooth and taut, with no cracks or tears.
Place the shaped boule seam-side up on a piece of parchment paper. Cover loosely with a damp towel and let it rest at room temperature for 1 hour. This final proof allows the dough to relax and expand slightly. Meanwhile, preheat your oven to 450°F with a Dutch oven inside for 45 minutes. The Dutch oven will create steam, essential for developing the bread's crisp crust and open crumb.
Score and Bake for Maximum Crisp
Carefully transfer the Dutch oven (with its lid) to the oven. Using a sharp razor blade or lame, score the top of the boule with a ½-inch deep crosshatch pattern. This allows the bread to expand evenly during baking. Immediately place the dough into the hot Dutch oven, sprinkle the top with 0.5 cup cornmeal, and cover with the lid.
Bake for 30 minutes covered, then remove the lid and bake for an additional 15-20 minutes until the crust is deep golden brown and sounds hollow when tapped. The internal temperature should reach 205-210°F. If the crust browns too quickly, loosely cover with aluminum foil to prevent over-browning while allowing steam to escape.
Cool and Serve for Optimal Texture
Remove the bread from the Dutch oven and transfer it to a wire rack. Immediately brush the crust with melted extra-virgin olive oil and sprinkle generously with 1 teaspoon coarse sea salt. Let the bread cool completely for at least 2 hours before slicing. This resting period allows the crumb to set and prevents a gummy texture.
The bread should have a crisp, crackly crust that gives way to an open, airy crumb with large, irregular holes. Slice with a serrated knife for clean cuts, and serve with olive oil for dipping or alongside soups and salads. For best results, store wrapped at room temperature for up to 3 days or freeze for longer storage.
Pro Tips For Making Artesano Bread Copycat
- Use Lukewarm Water: I learned this the hard way—yeast hates extremes. Fill your bowl with water that’s warm enough to touch without burning your wrist (around 100°F/38°C). Too hot and it kills the yeast; too cold and it won’t activate. Stick your finger in to test—if it feels like bathwater, you’re golden.
- Salt the Dough Early: Don’t wait until the end—mix the Diamond Crystal kosher salt into the flour before adding water. It dissolves more evenly, and the dough develops flavor from the start. (Yes, even if you’re impatient like me.)
- Stretch, Don’t Fold: When shaping the dough, resist the urge to fold it like a letter. Instead, gently stretch the sides toward the center—this creates tension for that signature crack. It’s messy at first, but the crust will thank you.
- Oil the Bowl Twice: Coat your mixing bowl with olive oil before adding the dough, then toss the dough in a little extra oil afterward. This prevents sticking and makes turning the dough easier—no scrubbing bowls later. (Trust me, you’ll hate yourself if you skip this.)
Flavor customization for this artesano bread copycat
Herb-Infused Variations
Add 1 tbsp fresh rosemary or thyme leaves to the dough during the final kneading step for an aromatic twist. The herbs infuse the crust with earthy notes that pair beautifully with olive oil dips.
I recommend using Penzeys Italian Herb Blend for a balanced flavor profile—just 1 tsp enhances without overpowering.
For a Mediterranean flair, fold in 1 tbsp finely chopped sun-dried tomatoes> and ½ tsp dried oregano> when shaping the boule. The tomatoes add a subtle sweetness that contrasts the crust's crispness. Store-bought sun-dried tomatoes work fine, but oil-packed varieties add extra moisture to the dough.
Spiced Sweet Variations
Swap the honey for 1 tbsp maple syrup> and add ½ tsp cinnamon> for a lightly sweetened loaf perfect for breakfast. The cinnamon pairs wonderfully with butter, creating a morning treat that rivals brioche. I often use McCormick Ground Cinnamon> for consistent results.
For a festive touch, mix in 1 tbsp orange zest> and ½ tsp cardamom> during the initial dough rest. The citrus brightens the crust while the cardamom adds warmth. Use freshly grated organic oranges> for the best flavor—avoid pre-packaged zest which can be bitter.
Savory Add-Ins
Boost umami by incorporating 1 tbsp nutritional yeast> and ½ tsp garlic powder> into the dough. This creates a cheesy, savory note that works perfectly with soups or charcuterie boards. I use Bragg Organic Nutritional Yeast> for its rich, nutty flavor.
For a rustic Italian touch, fold in ¼ cup grated Parmigiano-Reggiano> and 1 tbsp chopped black olives> when shaping. The cheese adds depth while the olives provide briny contrast. Use freshly grated Parmigiano> for maximum flavor—pre-shredded loses moisture quickly.
Gluten-Free Adaptation
Replace the bread flour with a 1:1 gluten-free flour blend> like King Arthur Measure for Measure>, plus an extra 1 tbsp xanthan gum> to mimic gluten's structure.
The dough will be slightly denser but still develops a crisp crust. Increase the olive oil to 3 tbsp> for extra tenderness.
For best results, extend the fermentation time to 14 hours> since gluten-free dough ferments more slowly. The final proof should be longer—up to 2 hours>—to achieve proper rise. This adaptation works best in a Lodge cast iron Dutch oven>** for even heat distribution.
Nutrition facts
Frequently asked questions
Why does this recipe use ice cubes in the dough?
The ice cubes serve two critical purposes: they lower the dough temperature to slow fermentation, preventing overproofing during the long rest, and they create tiny ice crystals that burst during baking, contributing to the signature open crumb structure. This technique mimics traditional Italian methods where dough is often chilled between stages. The result is a more controlled rise and that coveted airy interior.
Can I make this bread without a Dutch oven?
Yes, but you'll need to create steam another way. Place a baking sheet on the lower oven rack and pour 1 cup boiling water into it before baking. The steam will help develop the crust, though results may be slightly less crisp. A heavy oven-safe pot with a lid works almost as well as a Dutch oven for trapping steam. The key is maintaining moisture during the initial baking phase.
What's the best way to tell when the bread is fully baked?
Look for three indicators: the crust should be deep golden brown, tapping the bottom should produce a hollow sound, and the internal temperature should reach 205-210°F. The bread will continue cooking as it cools, so remove it when it's just slightly underdone. If unsure, check the internal temperature with an instant-read thermometer—this is the most reliable method.
Why does the recipe call for resting the dough overnight?
The overnight rest at room temperature (or in the fridge) allows for slow fermentation, which develops deeper flavor and better gluten structure. This extended proofing creates the bread's signature open crumb and enhances the yeast's activity, resulting in a more complex taste. The cold slows fermentation, giving you more control over the final texture. Think of it as letting the dough "rest" like a fine wine—patience pays off!
What's the best way to store and revive stale bread?
Wrap the cooled loaf in a clean kitchen towel and store at room temperature for up to 3 days. To revive stale slices, warm them in a 350°F oven for 5 minutes> or toast in a dry skillet over medium heat>. For longer storage, freeze slices in a ziplock bag> for up to 3 months**>. The towel wrapping prevents moisture loss, while the low-heat revival restores that fresh-baked crispness.