Side Dishes
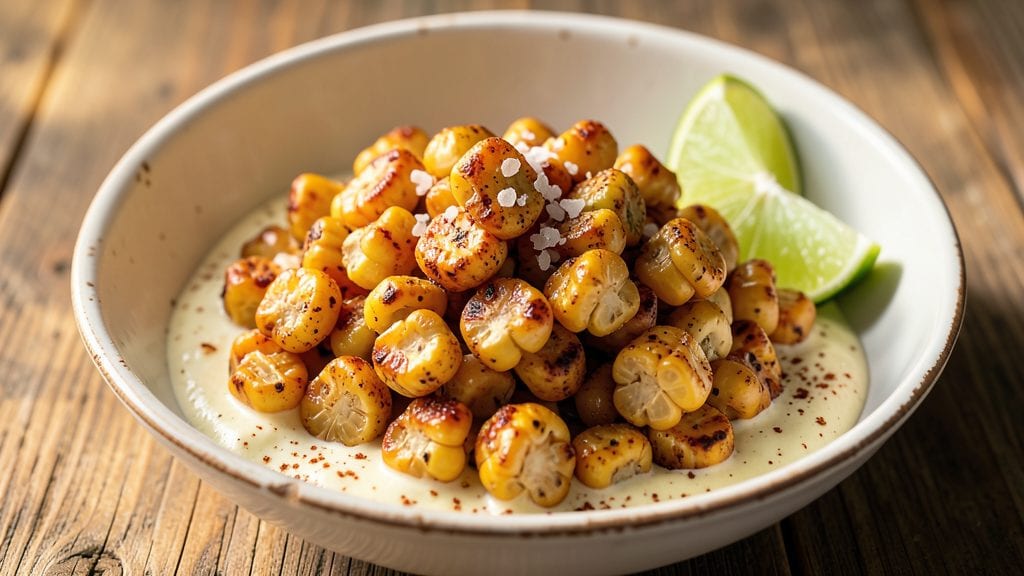
This easy canned street corn recipe turns your pantry staples into a crispy, creamy, zesty side in just 15 minutes—no fuss, no special tools.
Standing on a step stool in my grandmother’s kitchen in Sicily, I learned that the secret to great street corn lies in balancing simplicity with bold flavors, and this recipe delivers exactly that.
The magic happens when you heat the corn just right, then blanket it in a creamy, tangy sauce that’s impossible to resist.
This recipe is designed for the home cook who wants restaurant-quality results without the effort.
With just a handful of ingredients—canned corn, butter, mayo, and a pinch of spices—you’ll achieve that perfect texture: crispy edges from the oven or stovetop, a creamy sauce that clings to every kernel, and a zesty kick from lime and chili powder.
It’s the kind of dish that transforms a simple side into the star of the meal, and it’s foolproof for even the busiest weeknight.
The best part? You can customize it to your taste—add a sprinkle of cotija cheese for extra richness, a dash of smoked paprika for depth, or even a pinch of cayenne for heat. The sauce is foolproof, the technique is straightforward, and the results are always impressive.
Whether you’re serving it at a summer barbecue or as a quick weeknight side, this recipe will become a staple in your rotation.
Ready in just 15 minutes, this canned street corn recipe proves that easy doesn’t mean boring. Let’s get started—your taste buds (and your dinner guests) will thank you.
Ingredients for easy canned street corn
Canned corn, butter, mayo, and a pinch of spices—this easy street corn recipe delivers crispy, creamy, zesty perfection in 15 minutes.
| Ingredient | Amount | Notes |
|---|---|---|
| Canned Corn Kernels 🌽 | 15 oz | Drained, no liquid |
| Unsalted Butter 🧈 | 4 tbsp | Cold, cubed for browning |
| Mayonnaise 🥛 | ½ cup | Full-fat preferred |
| Lime Juice 🍋 | 2 tbsp | Freshly squeezed |
| Chili Powder 🌶️ | 1 tbsp | Smoked or regular |
| Garlic Powder 🧄 | 1 tsp | Freshly ground preferred |
| Salt 🧂 | ½ tsp | Kosher or sea salt |
| Black Pepper 🌶️ | ¼ tsp | Freshly ground |
| Cotija Cheese 🧀 | ¼ cup | Crumbled, optional |
| Cilantro Leaves 🌿 | ¼ cup | Chopped, optional |
| Vegetable Oil 🫒 | 1 tbsp | For stovetop crisping |
The canned corn is the star here, so pick a high-quality brand—look for brands like Libby’s or Del Monte that keep their kernels intact. I always grab the whole kernel corn in the blue can, not the cut-up kind. The butter matters too—use unsalted so you control the saltiness. For the mayo, Duke’s or Hellmann’s work great, but if you’re watching calories, use half mayo and half Greek yogurt. The lime juice? Fresh is a must—bottled just won’t cut it. I keep a lime on the counter all summer so it’s ready whenever I am.
No chili powder? Substitute smoked paprika or a pinch of cayenne for heat. Short on mayo? Greek yogurt or sour cream works in a pinch—just add a splash of milk to thin it out. Skip the cotija cheese? Feta or parmesan give a similar salty kick. The cilantro is optional, but if you love it, taste before adding—some people find it overpowering. For extra crispiness, I sometimes toss the corn in cornstarch before browning, but it’s not necessary if you’re patient with the stovetop method.
This keeps well for 3-4 days in the fridge, but honestly, it’s best eaten fresh. If you’re prepping ahead, store the sauce and corn separately—mix just before serving. The crispy edges soften overnight, so if you’re making this for a party, reheat the corn in a dry skillet for 2-3 minutes to restore that perfect texture. Leftovers? Toss them in tacos or salads—they’re just as delicious cold.
Why You'll Love This Recipe
- Four-Ingredient Magic: I swear, this is the kind of recipe where you open the pantry and suddenly dinner’s solved. No chopping, no waiting for water to boil—just dump, stir, and devour.
- Zingy Creamy Heat: That lime juice cutting through the mayo? It’s the secret weapon. The chili powder gives it a smoky kick, while the butter makes every bite feel like a hug.
- Party in a Bowl: Serve it warm or cold—it’s the ultimate snack for game day, potlucks, or when your friends drop by unannounced. (Yes, even on a Tuesday night.)
- Budget Win: Canned corn and mayo stretch to feed four for under $5. The leftovers? Just as good the next day—if they last that long.
Step-by-step instructions for crispy canned street corn
Here's how to make this crowd-pleasing dish in just 15 minutes with pantry staples.
Drain and Pat Dry the Canned Corn Kernels
Open the 15 oz canned corn kernels and drain them thoroughly in a colander, shaking gently to remove all liquid. Transfer to a clean kitchen towel and pat dry completely. This step is crucial for achieving crispy corn—any moisture will prevent proper browning. I like to spread the corn in a single layer on the towel and press down gently to absorb excess moisture. You'll know they're ready when they look dry to the touch.
While the corn dries, measure out the 4 tbsp unsalted butter and cut it into small cubes. Keep these cold until you're ready to use them—they'll help create that perfect crispy crust. The corn should be completely dry before moving to the next step, so don't rush this part. If you're short on time, you can use a paper towel to help absorb moisture more quickly.
Create the Creamy Chili-Lime Dressing
In a medium bowl, combine the 0.5 cup mayonnaise, 2 tbsp lime juice, 1 tbsp chili powder, 1 tsp garlic powder, 0.5 tsp salt, and 0.25 tsp black pepper. Whisk until smooth and fully incorporated. The mixture should be thick but still pourable. If you prefer a tangier flavor, you can add an extra tablespoon of lime juice, but start with the recipe amount first.
Taste the dressing and adjust seasoning if needed. This is your flavor foundation, so don't skip this step. The lime juice should brighten the mayonnaise, while the chili powder and garlic powder add warmth. The dressing will thicken slightly when mixed with the corn, so it's better to start with a slightly thinner consistency. Set this aside while you prepare the corn for browning.
Crisp the Corn in a Hot Skillet
Heat 1 tbsp vegetable oil in a large skillet over medium-high heat until shimmering. Add the cold butter cubes and let them melt completely, about 1 minute. This creates a flavorful fat base for crisping the corn. Add the dried corn kernels in a single layer, spreading them out evenly across the pan. Cook undisturbed for 3-4 minutes until the corn begins to brown and crisp in spots.
Here's the thing—you want the corn to develop color and texture without burning. Stir gently with a spatula, working quickly to ensure even browning. The corn should look golden in places with some crispy edges. If you notice the butter is browning too quickly, reduce the heat slightly to medium. This crisping step is what transforms simple canned corn into restaurant-quality street corn.
Toss and Combine All Ingredients
Remove the skillet from heat and immediately add the corn to the bowl with the chili-lime dressing. Using a spatula, toss gently but thoroughly to coat each kernel evenly. The residual heat from the corn will help the dressing cling perfectly. Let the mixture sit for 1-2 minutes to allow the flavors to meld together.
While the corn is still warm, sprinkle with the 0.25 cup crumbled cotija cheese and 0.25 cup chopped cilantro leaves. Toss one final time to distribute these toppings evenly. The cheese should melt slightly from the heat, while the cilantro adds freshness. Serve immediately while the corn is still crispy and the cheese is just beginning to soften. If you prefer extra crunch, you can hold off on adding the cheese until serving.
Serve and Enjoy Your Crispy Creation
Transfer the corn to a serving dish or directly to plates. The corn should have a perfect balance of crispy edges from the skillet and creamy, tangy dressing throughout. Each bite should deliver that satisfying contrast of textures—crunchy corn, creamy mayo, and slightly melted cheese. If you're serving this as an appetizer, arrange it on a platter with lime wedges on the side for extra zing.
This dish comes together faster than you'd think, but the key is in those small details—the drying of the corn, the proper browning in the skillet, and the careful tossing with the dressing. Don't be tempted to skip any steps, especially the drying. The difference between soggy and crispy corn is all in the preparation. Serve with tortilla chips or warm tortillas for the ultimate street corn experience.
Pro Tips For Making Easy Canned Street Corn
- DRAIN AND RINSE CORN: Dump that canned corn straight into the bowl and you’ll end up with a soggy, watery mess. Drain the corn first, then rinse it under cold water to remove excess starch—this keeps the texture crisp and prevents the mayo from turning into a gloppy sauce. (Yes, even if you’re impatient like me.)
- MELT BUTTER FIRST: Cold butter clumps and fights you. Melt it first—just enough to soften—before mixing it into the corn. Warm butter blends smoother and coats the kernels evenly, so every bite gets that creamy, buttery goodness. Skip this, and you’ll be stirring like a madman trying to fix lumps.
- ACIDIFY THE MAYO: Toss in the lime juice before adding the mayo, not after. This prevents curdling and keeps the dressing bright and stable. I learned this the hard way when my first batch turned into a sad, grainy disaster. Trust me, a splash of lime first makes all the difference.
- CHILI POWDER LAST: Sprinkle that chili powder in at the very end, right before serving. Mixing it in early lets the spices mellow out, and you’ll lose that fresh, punchy kick. A quick toss just before eating keeps the heat vibrant—like the difference between a lukewarm burrito and one that actually makes you sweat.
Serving suggestions for leftovers
Appetizer Platter
Serve this crispy street corn as an appetizer on a platter with lime wedges and a sprinkle of extra chili powder. I like to arrange it alongside warm tortilla chips for scooping, or even mini corn tortillas for a fun twist.
Add a small bowl of the creamy dressing on the side for dipping—this makes it feel like a full spread. 🌶️
BBQ Pairings
This street corn is the perfect side for grilled meats. Pair it with smoky pulled pork, juicy burgers, or grilled chicken thighs. The creamy, tangy flavors balance the richness of BBQ perfectly.
I often serve it in a cast-iron skillet straight from the grill—just toss the corn with the dressing and serve immediately. The contrast of textures makes every bite exciting.
Taco Topping
Use this as a topping for tacos or nachos—it adds a creamy, zesty element that elevates the dish. Spoon the corn over warm tortillas with shredded chicken, black beans, and avocado.
The crispy edges hold up well, and the dressing adds moisture. For extra flair, drizzle with a little hot sauce or extra lime juice. It’s a game-changer for taco nights!
Game Day Snack
This dish is a crowd-pleaser at parties and game days. Serve it in a large bowl with a side of tortilla chips for easy grabbing. I like to add a few extra toppings like crumbled cotija cheese or chopped jalapeños for those who want more flavor.
The combination of creamy, spicy, and tangy makes it impossible to resist—perfect for fueling up during big events. ⚡
Meal Prep Hack
If you’re prepping ahead, store the dressing and corn separately in airtight containers. When ready to serve, toss them together and reheat in a dry skillet for 2-3 minutes to restore crispiness.
This works great for meal prep lunches or quick weeknight dinners. Just add a sprinkle of fresh cilantro or cotija cheese before serving to keep it fresh-tasting.
Kid-Friendly Twist
For picky eaters, serve the corn without the chili powder or cilantro—just the creamy mayo-lime dressing. Kids love the sweetness of the corn and the fun texture. You can also shape the corn into fun shapes with cookie cutters before crisping for a playful presentation.
A little creativity goes a long way with little ones! 💛
Nutrition facts
Frequently asked questions
Can I use frozen corn instead of canned corn for this recipe?
While canned corn is ideal for this quick recipe, you can use frozen corn if that's what you have on hand. Just make sure to thaw and pat it completely dry before crisping—excess moisture will prevent proper browning. For best results, spread the thawed corn on a paper towel and press gently to remove all liquid.
How do I make this recipe without mayo?
Swap the mayo for ½ cup Greek yogurt or sour cream for a lighter option. Thin it slightly with 1 tbsp milk if needed to reach the right consistency. The tangy flavor works beautifully with the chili-lime combo, and it's a great way to cut calories while keeping the creamy texture.
Can I bake this street corn instead of using a skillet?
Toss the dried corn with 1 tbsp melted butter and 1 tbsp oil, then spread on a baking sheet. Bake at 425°F for 15-20 minutes, stirring halfway, until golden. Broil for 1-2 minutes at the end for extra crispiness. The oven method is great for hands-off cooking when you're multitasking.
Why did my corn turn out soggy instead of crispy?
Soggy corn usually means moisture wasn't fully removed before cooking. Always pat the corn completely dry and avoid overcrowding the pan. For extra insurance, toss the corn with 1 tsp cornstarch before browning—this helps create a crispy barrier. Also, make sure your skillet is hot enough before adding the corn.
How can I make this spicier?
Boost the heat by adding ½ tsp cayenne pepper to the dressing or sprinkling chopped jalapeños on top. For a smoky kick, swap the chili powder for smoked paprika. If you love fresh heat, drizzle with hot sauce or serve with pickled jalapeños on the side. Just remember—start with small amounts and adjust to taste!