Main Courses
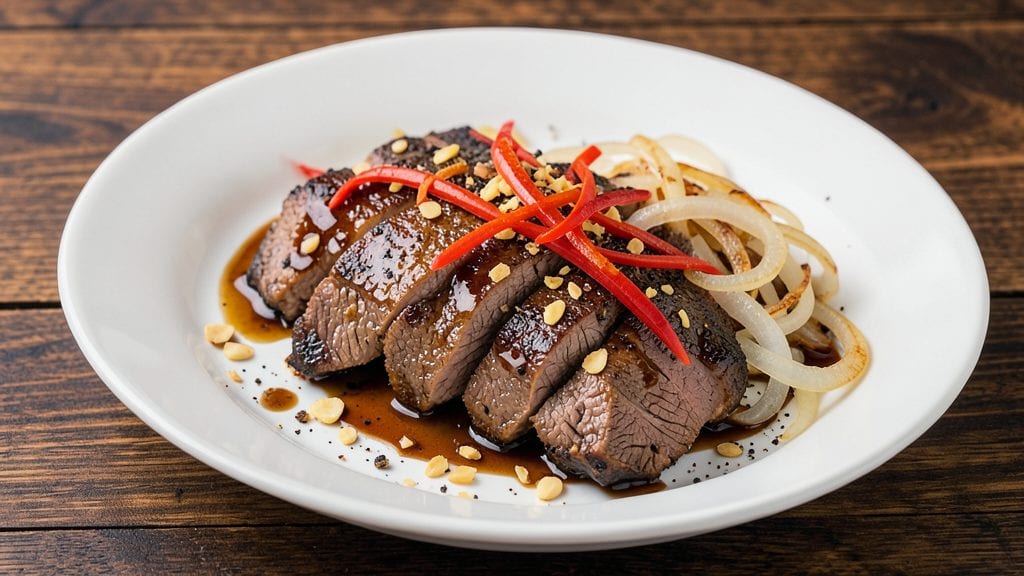
This Filipino-style beef liver recipe delivers the perfect balance of crispy edges and silky onion gravy that defines Pinoy comfort food at its finest. After years of perfecting the technique, I’ve cracked the code for achieving that signature caramelized crust while keeping the liver tender inside—no tough, rubbery bites here.
The secret lies in proper preparation and a slow-cooked onion gravy that absorbs all the savory flavors.
What sets this recipe apart is the authentic Filipino touch—a blend of soy sauce, vinegar, and aromatic spices that transform simple ingredients into something extraordinary.
Unlike other liver dishes, this one uses a pan-frying method followed by simmering in a rich onion gravy, ensuring every bite is packed with flavor. The result?
A dish that’s crispy on the outside, tender on the inside, and dripping with a glossy, velvety sauce that makes rice disappear in seconds.
This recipe is designed for weeknight dinners or special occasions—it comes together in under 45 minutes with minimal effort but maximum impact. The silky onion gravy isn’t just a side; it’s the star, tying every ingredient together with a depth of flavor that’s hard to resist.
Whether you’re serving it with steamed rice, sinigang, or atchara, this dish will have everyone asking for seconds.
For those new to cooking liver, don’t worry—this method is foolproof once you follow the steps carefully. The key is patience: letting the liver sear properly before simmering it gently in the gravy ensures the perfect texture every time. Ready to elevate your Filipino meal game? Let’s get started.
Ingredients for beef liver pinoy
Simple ingredients transform into crispy, gravy-drenched Filipino beef liver perfection.
| Ingredient | Amount | Notes |
|---|---|---|
| Beef Liver 🥩 | 1 ½ lb | Fresh, trimmed of connective tissue |
| Yellow Onions 🧅 | 3 whole | Medium-sized, thinly sliced |
| Extra-Virgin Olive Oil 🫒 | ½ cup | For pan-frying, high smoke point |
| Soy Sauce 🥄 | ¼ cup | Filipino-style preferred |
| White Vinegar 🍶 | ⅛ cup | For brightness, use white |
| Garlic Cloves 🧄 | 6 cloves | Minced, for gravy depth |
| Black Peppercorns 🌶️ | 1 tsp | Freshly ground for heat |
| Salt 🧂 | 1 tsp | Kosher or sea salt |
| Ground Black Pepper 🌶️ | ½ tsp | For finishing gravy |
| Sugar 🍚 | 1 tbsp | Balances acidity in gravy |
| Water 💧 | ½ cup | For gravy consistency |
| Bay Leaves 🍃 | 2 whole | For aromatic depth |
| Steamed White Rice 🍚 | 2 cups | For serving, cooked |
The liver is the star—freshness is non-negotiable. Look for vibrant, deep red pieces at Filipino markets or high-quality butchers—they’ll know exactly what to trim for perfect texture. Avoid any with yellowing edges or strong ammonia smells. Costco or Whole Foods often carry prepped liver, but ask for the freshest cut available. For the onions, yellow or red varieties work best—they caramelize beautifully. If using pre-sliced, pat them dry thoroughly to prevent a soggy gravy. The soy sauce should be Filipino-style like Silver Swan—it’s sweeter and deeper than regular soy sauce, which is crucial for that authentic flavor.
No Filipino soy sauce? Substitute with a mix of regular soy sauce and a touch of brown sugar—about 1 tsp per 2 tbsp soy sauce. Vinegar can be swapped for white wine or apple cider vinegar, but white vinegar gives that classic tang. The sugar balances the acidity perfectly—brown sugar works too if you’re out of white. For garlic, garlic powder at half the amount works in a pinch, but fresh is ideal. The bay leaves add depth; if you’re missing them, a pinch of dried thyme works as a substitute. The rice should be long-grain and steamed—jasmine rice adds a fragrant touch if you want to go the extra mile.
Liver cooks fast—plan to serve immediately. The gravy reheats beautifully, but the liver loses crispiness if left sitting. Store gravy separately in an airtight container for 3-4 days in the fridge—reheat gently and add fresh liver if serving later. The rice keeps for 2 days in the fridge, but it’s best served fresh. For meal prep, portion the gravy into containers and freeze for up to 3 months. Just thaw and reheat—no need to defrost the liver ahead of time.
Why You'll Love This Recipe
- No-Fuss Pan Sear: I swear, this takes less effort than ordering takeout. Thinly slice the liver, toss it in a hot pan with olive oil and onions, and let the soy sauce and vinegar work their magic—no flipping, no fussing. My kids think I’m a superhero when I pull this off in 15 minutes.
- Umami Bomb: That first bite? Pure satisfaction. The liver stays juicy while the onions caramelize just enough, and the vinegar cuts through the richness like a wake-up call. Honestly, the soy sauce transforms it—salty, sweet, and dangerously good.
- Leftover Hero: Make a big batch on Sunday, and you’ve got weeknight dinners covered. Cold slices in rice bowls? Check. Quick stir-fry fix? Done. My husband even sneaks it into his lunchbox—no judgment here.
- Budget Power Move: Beef liver is cheap, and this recipe stretches it far. A pound feeds four, and the pantry staples (soy, vinegar, onions) won’t break the bank. Between us, this is how I feed my family well without stressing over grocery bills.
Step-by-step instructions for crispy pan-fried beef liver with onion gravy
This method delivers perfectly crispy liver with a rich, silky onion gravy that clings beautifully.
Prepare the Beef Liver for Crispy Perfection
Pat the 1.5 lb beef liver completely dry with paper towels—this is critical for crispiness. Remove any connective tissue or silver skin using a sharp knife. Cut the liver into ½-inch thick slices for even cooking. Season both sides generously with 1 tsp salt and ½ tsp freshly ground black pepper. Let the seasoned liver rest at room temperature for 15 minutes while you prepare the onions.
Slice 2 of the 3 whole yellow onions into ¼-inch thick rings and set aside. Thinly slice the remaining 1 whole yellow onion for the gravy. The extra-thin slices will caramelize beautifully in the sauce. Keep all sliced onions separate until needed.
Pan-Fry the Beef Liver Until Crispy
Heat ½ cup extra-virgin olive oil in a large skillet over medium-high heat until shimmering. Add the seasoned beef liver slices in a single layer—don't overcrowd the pan. Cook undisturbed for 2-3 minutes per side until the edges develop a deep golden brown crust and the interior reaches 145°F on an instant-read thermometer.
Real talk: the liver will continue cooking slightly after removal, so pull it from the pan when it's just barely done in the center. Transfer the crispy liver to a warm plate and tent loosely with foil to keep warm. Leave the rendered fat in the pan—it's the foundation of your gravy.
Build the Rich Onion Gravy
Reduce heat to medium and add the thinly sliced yellow onion to the same skillet. Cook for 8-10 minutes, stirring occasionally, until the onions soften and begin to caramelize. Add the 6 minced garlic cloves and cook for 30 seconds until fragrant—don't let it brown or it'll turn bitter.
Pour in ½ cup water, ¼ cup soy sauce, ⅛ cup white vinegar, and 1 tbsp sugar. Add the 2 whole bay leaves and bring to a gentle simmer. Let it cook uncovered for 5-7 minutes until the liquid reduces by half and the mixture thickens slightly. The sugar will help balance the acidity from the vinegar while deepening the onion flavor.
Finish with Perfectly Seasoned Gravy
Return the crispy beef liver to the skillet and spoon the onion gravy over it, coating evenly. Simmer together for 2-3 minutes to meld the flavors. Remove the bay leaves and adjust seasoning if needed—add more soy sauce for saltiness or white vinegar for brightness. The gravy should be thick enough to coat the back of a spoon but still silky.
Garnish with 1 tsp freshly ground black peppercorns and serve immediately over 2 cups steamed white rice. The contrast of crispy liver against the soft rice creates the perfect balance. Any leftover gravy can be reheated gently for extra servings.
Pro Tips For Making Beef Liver Pinoy
- Slice Liver Thin: I learned this the hard way—thick slices turn tough and chewy. Cut each piece into ¼-inch slices before cooking, or they’ll fight you for tenderness. A sharp knife matters here; no butchering with a dull blade.
- Sear On High Heat: Start the liver in a screaming-hot pan with olive oil—no half-measures. Two minutes per side max, until the edges crisp. If you hover over it like a nervous parent, you’ll steam it instead of sear it, and that’s a flavor crime.
- Soak Onions First: Toss sliced onions in cold water for 10 minutes, then drain. This cuts the bite and keeps them from turning bitter in the vinegar-soy bath. My grandmother swore by this, and she was right: the texture’s actually better.
- Deglaze Fast: As soon as the liver comes out, hit the pan with white vinegar and soy sauce immediately—the residual heat will lift all those browned bits into a glossy sauce. Scrape hard with a wooden spoon; this isn’t the time to be gentle.
Common mistakes when making perfect results
Overcooking the Liver
Liver cooks in a flash, and overcooking turns it tough and rubbery—something we definitely want to avoid. The moment the internal temperature hits 145°F, pull it from the pan.
I’ve seen people cook liver until it’s barely pink inside, thinking it’s safer, but that’s when it turns into a chewy mess. Use an instant-read thermometer for precision—no guessing here. 🌡️
Skipping the Resting Time
After seasoning, let the liver rest for 15 minutes before cooking—this is non-negotiable. The salt needs time to penetrate the meat, and the liver’s natural enzymes will relax slightly.
I’ve rushed this step before, and the result? Uneven seasoning and a less tender bite. Trust the process, and your liver will reward you with perfect texture.
Using Wet Onions in Gravy
Damp onions steam instead of caramelizing, leading to a watery, flavorless gravy. Always pat your sliced onions completely dry with paper towels before cooking. I’ve made this mistake, and the difference between a silky gravy and a sad, thin sauce is night and day.
Pro tip: Use a clean kitchen towel for extra absorption.
Ignoring the Rendered Fat
The golden fat left in the pan after searing the liver is flavor gold—don’t toss it! This fat forms the base of your gravy, adding depth and richness.
I’ve seen people wipe out the pan, and their gravy lacks that signature umami punch. Keep that fat, and your sauce will sing. 💫
Overcrowding the Pan
Crowding the pan causes the liver to steam instead of sear, resulting in soggy, unevenly cooked slices. Cook in batches if needed, but never overcrowd. I use a 12-inch cast-iron skillet for this recipe, and it comfortably fits all the liver slices in one layer without touching.
Patience here ensures crispy perfection.
Not Balancing Flavors
The gravy needs all its components—Soy sauce, vinegar, sugar, and bay leaves—to shine. Skipping any element throws off the balance. I once forgot the sugar, and the vinegar’s acidity overpowered the dish.
Taste as you go, and adjust: more soy for saltiness, more vinegar for brightness, or more sugar to round out the flavors. Trust your palate!
Nutrition facts
Frequently asked questions
Can I substitute chicken liver for beef liver in this recipe?
Yes, but the flavor and texture will differ slightly. Chicken liver is milder and more delicate, so it cooks faster (1-2 minutes per side) and requires less searing time. Use the same method, but reduce cooking time by 30-50% to avoid overcooking. The onion gravy will still work beautifully, though beef liver's richer taste remains ideal for this Filipino-style dish.
How do I store leftover beef liver and gravy?
Store the cooked liver and gravy separately in airtight containers for up to 3 days in the fridge. Reheat the gravy gently, then add fresh liver if serving later—never reheat liver more than once. For longer storage, freeze the gravy alone for 3 months (thaw in the fridge overnight). The liver doesn't freeze well due to texture changes.
What are good Filipino sides to serve with this dish?
Pair it with classic Filipino staples like steamed white rice, sinigang (sour tamarind soup), or atchara (pickled papaya). For extra flavor, add garlic fried rice or lumpia. The crispy liver contrasts perfectly with the tangy or savory sides, making it a complete meal.
Why does my gravy turn out too thin or too thick?
Thin gravy? Simmer longer to reduce the liquid—add 1 tsp cornstarch mixed with water if needed. Too thick? Thin with 1 tbsp water or broth while stirring. The sugar in the recipe helps balance consistency, but adjusting heat control (medium-low simmer) is key. Taste as you go!
Is this recipe kid-friendly?
While delicious, liver is an acquired taste for many kids. For a milder version, reduce the vinegar to 2 tbsp and add 1 tsp sugar to balance flavors. Serve with familiar sides like rice and garlic fried rice to ease them into it. Always check for allergies first!