
Main Courses
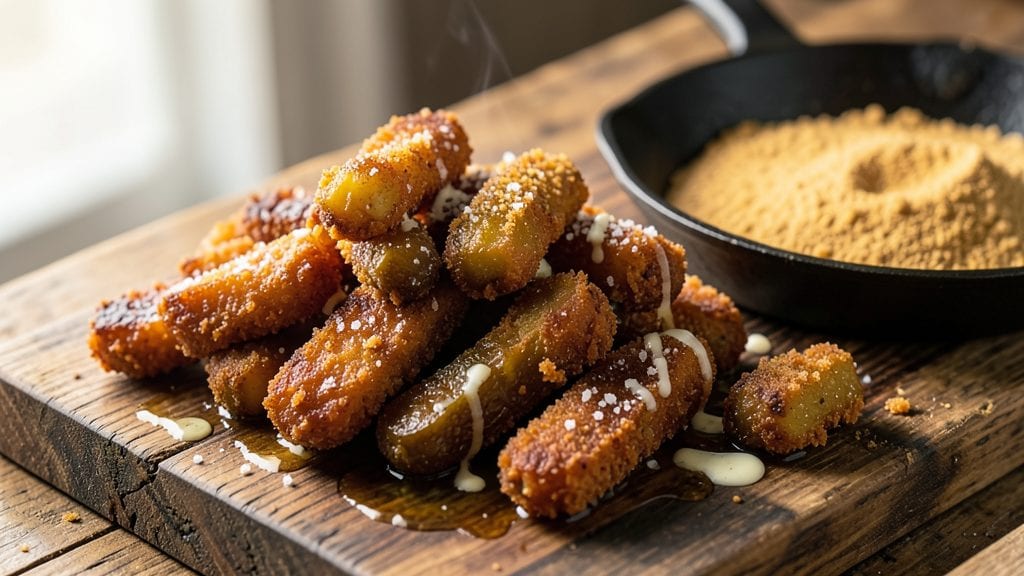
Recreating Cracker Barrel fried pickles at home delivers that same addictive crunch and tangy vinegar bite you crave. The secret lies in a perfectly balanced cornmeal batter that creates a golden, crispy shell while keeping the pickles tender inside.
I've perfected this technique after countless batches—there's nothing quite like that first crunchy bite followed by the tangy vinegar punch.
This recipe transforms simple dill pickles into a restaurant-quality appetizer with just five key ingredients and a precise frying method. The cornmeal batter is the game-changer, creating that signature crispy texture that sets these apart from regular fried foods.
You'll need hot oil (350°F) and quick, confident movements to maintain that perfect crunch.
What you'll end up with is a plate of golden-brown fried pickles that are crispy on the outside and tangy on the inside—each bite delivers that satisfying crunch followed by the bright vinegar flavor.
The batter clings perfectly to the pickles without being too thick, ensuring maximum crispiness every time. Serve immediately with your favorite dipping sauce for the full Cracker Barrel experience.
These fried pickles are perfect for game day, movie nights, or as an appetizer when entertaining guests. The recipe makes enough for a crowd, and leftovers reheat beautifully in the oven. Once you try homemade, you'll never settle for store-bought again—they're that good.
Ingredients for cracker barrel fried pickles
Five ingredients transform dill pickles into addictive, golden bites—crispy outside, tangy inside.
| Ingredient | Amount | Notes |
|---|---|---|
| Dill Pickles 🥒 | 2 lb | Brine-packed, spears or chips |
| All-Purpose Flour 🌾 | 1 cup | White or self-rising preferred |
| Fine Yellow Cornmeal 🌽 | 1 cup | Not coarse, for crispiness |
| Seasoned Salt 🧂 | 1 tbsp | Like Lawry's or similar |
| Vegetable Oil 🫒 | 3 cups | High smoke point preferred |
| Butter 🧈 | 2 tbsp | Melted, for richness |
| Large Eggs 🥚 | 1 whole | Room temperature for batter |
| Lemon Juice 🍋 | 1 tbsp | Fresh, for brightness |
| Garlic Powder 🧄 | ½ tsp | For subtle depth |
| Paprika 🌶️ | ½ tsp | Smoked for color |
| White Vinegar 💧 | 2 tbsp | For tangy kick |
| Vegetable Oil Spray 🫒 | 1 can | For pre-coating pickles |
The pickles are non-negotiable—brine-packed dill spears from the grocery store's refrigerated section work best. Heinz or Vlasic are reliable, but check the label for 'dill' (not 'sweet'). For chips, look for 'pickle chips' in the snack aisle—Kettle Brand has the best texture. The cornmeal is key: fine yellow (not coarse) creates that signature crispy shell. I grab mine from the baking aisle at Walmart—cheaper than specialty stores and just as good. If you're feeling fancy, Bob's Red Mill adds a nutty depth, but regular works fine.
No cornmeal? All-purpose flour plus 1 tsp baking powder gets you close, but the texture won't be identical. Short on dill pickles? Gherkins or bread-and-butter pickles work, but the flavor won't be as bright. The batter needs to be thin but coatable—like pancake batter consistency. If it's too thick, add a splash of milk; too thin, stir in more cornmeal. The Lawry's seasoned salt is my go-to, but any mix of salt, garlic powder, and paprika works. Pro tip: Pat the pickles dry before dredging—they'll fry up crispier.
These are best served immediately, but if you must prep ahead, keep them warm in a 200°F oven on a wire rack (not a plate). They lose crispiness fast, so reheat for 2-3 minutes if storing. For leftovers, freeze on a tray first, then bag—they reheat beautifully in the air fryer at 375°F for 3-4 minutes. The oil? Strain and reuse once—just top off with fresh. Store-bought pickles keep for 1 month unopened, but once opened, use within 3 weeks for best flavor.
Why You'll Love This Recipe
- Fewer Ingredients, Bigger Payoff: I swear by this recipe because it’s ridiculously simple—just flour, cornmeal, pickles, and oil. No fancy blends or hidden spices; the seasoned salt does all the heavy lifting while keeping it budget-friendly.
- Crispy-Creamy Magic: That golden crust from the cornmeal and flour? It’s the best part. The outside shatters with every bite, but the inside stays juicy—like a perfect balance of crunch and tang that’ll have you reaching for seconds.
- Game for Any Gathering: Between us, these are my go-to for tailgates, game day, or even a lazy Sunday snack. They’re hearty enough to stand alone but pair perfectly with burgers, wings, or even just a cold beer.
- Leftovers? No Problem: Honestly, they stay crispy for days if you store them right—just toss them in the fridge and reheat in the oven for 5 minutes. I’ve made a batch on Sunday and still had them by Thursday. Zero waste, maximum flavor.
Step-by-step instructions for crispy cornmeal fried pickles
Here's how to make restaurant-style fried pickles with that perfect crunchy exterior and tangy bite.
Prepare the Pickles for Maximum Crispiness
Start by draining the 2 lb dill pickles thoroughly and patting them completely dry with paper towels. I can't emphasize enough how important this step is—any moisture left on the pickles will prevent proper browning and create a soggy coating. Place the pickles in a single layer on a baking sheet and spray them lightly with the vegetable oil spray, making sure to coat each spear evenly. This pre-coating helps the batter adhere better and creates that golden crust we're after.
While the pickles dry, melt the 2 tbsp butter in a small saucepan over low heat. Once melted, remove from heat and let it cool slightly. This butter will add richness to our batter, so don't skip this step. The pickles are now ready for the next transformation—from tangy spears to crispy bites.
Create the Crunchy Cornmeal Batter
In a large bowl, whisk together the 1 cup all-purpose flour, 1 cup fine yellow cornmeal, 1 tbsp seasoned salt, 0.5 tsp garlic powder, and 0.5 tsp paprika. This combination gives us both structure and that signature crunch. Make a well in the center of the dry ingredients and add the 1 whole large egg, 1 tbsp lemon juice, and 2 tbsp white vinegar. Using a fork or whisk, gently combine everything until just mixed—you don't want to overwork the batter or it will become tough.
Slowly pour in the 3 cups vegetable oil while continuing to stir. The batter should be thick but pourable, similar to pancake batter. If it's too thick, add 1 tablespoon of water at a time until you reach the right consistency. This batter is the secret to our crispy exterior—it needs to be just right to create that perfect crunch.
Fry the Pickles to Golden Perfection
Heat 1 inch of vegetable oil in a deep skillet or Dutch oven over medium heat until it reaches 350°F. You'll know it's ready when a small piece of batter dropped in sizzles and floats to the surface. Working in batches to avoid crowding, dip each pickle spear into the batter, letting any excess drip off before carefully placing it in the hot oil. Fry for 2-3 minutes per side until golden brown and crispy. Don't walk away—keep a close eye on them to prevent burning.
As you fry, place the cooked pickles on a wire rack set over a paper towel-lined plate. This allows air to circulate and keeps them crispy. The pickles should be a deep golden color with a crunchy exterior that gives way to that familiar tangy pickle bite. If you notice any pickles browning too quickly, reduce the heat slightly to maintain even cooking.
Serve Immediately for Maximum Crunch
Transfer the fried pickles to a serving platter and sprinkle with additional seasoned salt if desired. Serve immediately while they're still hot and crispy. The contrast between the crunchy exterior and the tangy pickle inside is what makes these so addictive. I like to pair them with a cool beer or creamy ranch dressing to balance the flavors.
These pickles are best enjoyed right away, but if you need to hold them for a few minutes, keep them warm in a 200°F oven. The longer they sit, the more they'll lose their crispiness, so don't wait too long. Each bite should deliver that satisfying crunch followed by the familiar tang of dill pickles—a perfect combination that's hard to resist.
Pro Tips For Making Cracker Barrel Fried Pickles
- PAT THE PICKLES DRY: I learned this the hard way—wet pickles steam instead of crisp up. Grab paper towels and blot each spear thoroughly before dredging. Even if they’re fresh from the jar, take the extra 30 seconds. The crust won’t stick right otherwise, and you’ll end up with soggy, greasy messes.
- USE A MIXED BATTER: Skip the all-flour route—Cracker Barrel’s magic is in that cornmeal. For every cup of flour, mix in 2 tablespoons of fine yellow cornmeal. It’s what gives those pickles that perfect crunch and golden color. (Yes, even if your recipe doesn’t mention it—trust me.)
- FRIE IN BATCHES: Crowd the pan, and the oil temperature crashes. You’ll get greasy pickles instead of crispy ones. Work in small batches—no more than 4-5 pickles at a time—so the oil stays hot and steady. Patience here makes all the difference.
- SEASON THE OIL: After the first batch, the oil’s flavor gets dull. Before frying the next round, add a pinch of seasoned salt and let it sizzle for 10 seconds. It keeps every batch tasting fresh, like they’re straight out of the restaurant. (Your taste buds will notice.)
Common mistakes when making your cracker barrel fried pickles
Batter Too Thick
The most common mistake is making the batter too thick, which leads to dense, greasy fried pickles instead of crispy ones. I’ve seen people add too much flour or cornmeal, thinking it’ll make them extra crunchy—but it actually creates a heavy coating that absorbs oil instead of frying up light.
The batter should be like pancake batter consistency—thin enough to coat the pickles evenly but thick enough to cling. If yours looks like mashed potatoes, stir in 1 tablespoon of water at a time until it flows smoothly. 💡
Skipping Drying Step
Leaving moisture on the pickles is a recipe for disaster—literally. Wet pickles steam instead of fry, resulting in a soggy, uneven coating. I once rushed through this step and ended up with pickles that were more boiled than fried.
Pat them completely dry with paper towels, then spray lightly with oil before dredging. This pre-coating ensures the batter sticks properly and fries up golden and crispy every time.
Overcrowding the Fryer
Dumping all the pickles into the oil at once is a rookie move that lowers the oil temperature and causes uneven cooking. The oil needs to stay at 350°F for that perfect crisp.
Fry in small batches—I use 4-5 pickles per batch—and let them cook undisturbed for 2-3 minutes per side. Crowding also makes it harder to flip them evenly, leading to half-cooked or burnt spots. A Dutch oven or deep skillet with high sides is ideal for this.
Incorrect Oil Temperature
Frying at the wrong temperature ruins everything. Too cool, and the pickles absorb oil and turn greasy. Too hot, and they burn before the batter sets. The sweet spot is 350°F—use a deep-fry thermometer to monitor it.
I’ve seen people guess and end up with oily, limp pickles or charred, bitter bites. If you don’t have a thermometer, test with a small piece of batter—it should sizzle and float immediately. Adjust heat as needed to maintain this temp.
Not Draining Excess Batter
Letting excess batter drip back into the fryer creates a greasy, uneven coating and lowers the oil temperature. After dipping each pickle, tap it gently against the edge of the bowl to remove excess batter before placing it in the oil.
I also use a wire mesh skimmer to lift pickles in and out—it helps drain batter while keeping your hands safe. Skipping this step leads to soggy, unevenly fried pickles that lack that signature crunch.
Letting Them Sit Too Long
Fried pickles lose crispiness faster than you think. I’ve had guests ask why their homemade version wasn’t as good as Cracker Barrel’s—turns out, they left them sitting for 10 minutes while setting the table. Serve them immediately on a wire rack (not a plate) to keep air circulating.
If you must hold them, keep the oven at 200°F and reheat for 2-3 minutes before serving. The difference between crispy perfection and oily disappointment is often just timing.
Nutrition facts
Frequently asked questions about crispy fried pickles
Can I use pickle chips instead of spears?
Pickle chips work perfectly for this recipe—just adjust frying time to 1-2 minutes per side since they're thinner. The cornmeal batter will cling beautifully, creating tiny crispy bites. For extra crunch, lightly crush some chips before dipping in the batter.
What's the best way to reheat leftover fried pickles?
Reheat in an air fryer at 375°F for 3-4 minutes for maximum crispiness. If using an oven, place on a wire rack over a baking sheet at 400°F for 2 minutes. Microwaving will make them soggy—avoid at all costs! The key is quick, high-heat reheating.
Can I make this batter ahead of time?
Yes, but prepare it fresh for best results. If storing overnight, mix dry ingredients only and refrigerate. Add wet ingredients (egg, oil, etc.) just before frying. The batter thickens when refrigerated, so you may need to add 1-2 tablespoons water to reach proper consistency. Never refrigerate the complete batter.
Why did my pickles turn out greasy instead of crispy?
Greasy pickles usually mean one of three things: oil temperature too low (350°F is critical), batter too thick (should be like pancake batter), or frying time too short. Double-check your oil temp with a thermometer and fry until golden brown (2-3 minutes per side). The batter must be thin enough to drain properly.
What are the best dipping sauces for these?
Classic ranch or blue cheese dressing works perfectly, but try these creative options too: spicy mayo (mix mayo with sriracha), tangy honey mustard, or smoky chipotle aioli. For a lighter option, squeeze fresh lemon over the pickles before serving. The key is balancing the crispy crunch with cool, creamy, or tangy flavors.