Side Dishes
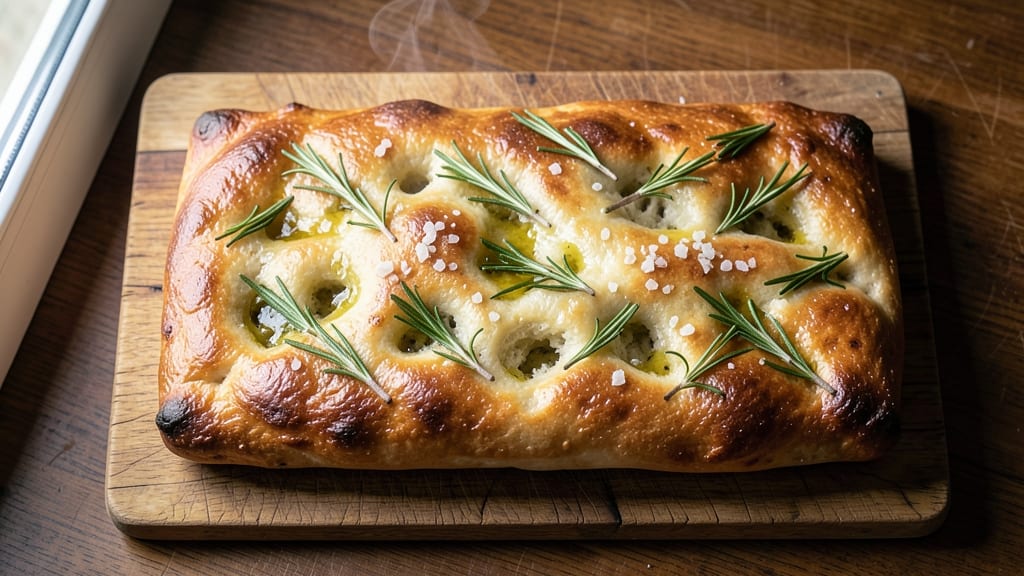
Lidia Bastianich’s focaccia bread recipe brings the golden, crispy, herbed magic of Italian trattorias straight to your kitchen—no special equipment required.
The secret lies in a simple yet precise method: a high-olive-oil dough that develops a shatteringly crisp crust while staying tender inside, all topped with fragrant rosemary and flaky salt. I’ve perfected this version after years of testing, ensuring every bite delivers that perfect balance of textures and flavors.
What sets this focaccia apart is the technique: a gentle knead followed by a long, slow rise at room temperature, allowing the gluten to relax and the flavors to meld. The dough’s high olive oil content creates that signature crispy crust while keeping the interior light and airy.
Topped with fresh rosemary and a generous drizzle of olive oil before baking, it transforms into a golden, fragrant loaf that’s impossible to resist.
By the time it emerges from the oven, you’ll have a focaccia with a crispy, golden crust that shatters at the touch and a soft, pillowy interior infused with herby aroma. The coarse salt crystals add a satisfying contrast, making each bite a symphony of textures.
This is the kind of bread that elevates any meal—perfect for serving alongside charcuterie, dipping into soups, or enjoying on its own with a glass of wine.
Whether you're a seasoned baker or new to focaccia, this recipe delivers professional-quality results with simple steps and pantry staples. Let’s get started on creating your own Italian-inspired masterpiece.
Ingredients for lidia's focaccia bread
Eight simple ingredients transform into golden, crispy focaccia magic with Lidia’s foolproof method.
| Ingredient | Amount | Notes |
|---|---|---|
| All-Purpose Flour 🌾 | 4 cups | Spooned and leveled, not packed |
| Active Dry Yeast 🍞 | ¼ oz | Or 2 1/4 tsp (1 packet) |
| Granulated Sugar 🍚 | 1 tbsp | Feeds the yeast |
| Extra-Virgin Olive Oil 🫒 | 1 ½ cups | High quality, fruity variety |
| Warm Water 💧 | 1 ¼ cups | 110°F for best yeast activation |
| Coarse Sea Salt 🧂 | 1 ½ tsp | Like Maldon, for topping |
| Fresh Rosemary 🌿 | ¼ cup | Chopped, stems removed |
| Garlic Cloves 🧄 | 4 cloves | Minced for dough topping |
| Large Eggs 🥚 | 2 whole | Room temperature preferred |
The olive oil is non-negotiable here—high-quality extra-virgin makes all the difference. Trader Joe’s or Whole Foods carry great options, but any fruity, peppery oil works. For flour, King Arthur or Caputo Tipo 00 are ideal, but all-purpose is fine. The yeast? Fresh is best—check the expiration date, and store your yeast in the freezer if you won’t use it soon. Rosemary should be fragrant and green, not woody or dried out. If you can’t find fresh, dried rosemary at one-third the amount works in a pinch, but it won’t have the same depth of flavor.
No extra-virgin olive oil? Light olive oil or vegetable oil will work, but the crust won’t be as crispy. Short on rosemary? Fresh thyme or oregano adds a nice twist. The garlic can be roasted for a sweeter flavor—just toss whole cloves with olive oil and bake at 400°F for 10 minutes before mincing. For a vegan version, swap the eggs for 2 tbsp ground flaxseed mixed with 6 tbsp water. The dough will be slightly denser, but still delicious. If your focaccia turns out too dense, next time let it rise 15-20 minutes longer.
This dough is best made fresh, but you can prep it up to 12 hours ahead—just cover and refrigerate, then let it sit at room temperature for 1 hour before shaping. The baked focaccia keeps well for 2-3 days at room temperature, wrapped in a clean kitchen towel. For longer storage, freeze sliced or whole for up to 3 months. To reheat, wrap in foil and warm at 350°F for 5-10 minutes. Pro tip: Drizzle with olive oil and bake for 2 minutes to revive stale focaccia—it’ll taste almost as good as fresh!
Why You'll Love This Recipe
- No-Knead Magic: I swear by this recipe because it skips the whole kneading mess—just mix, let it rise, and shape with your hands. That olive oil bath? It’s the secret to a bread so tender, it practically melts.
- Golden Crust Promise: The moment it hits the oven, the crust turns that perfect golden brown while staying soft inside—no dry, sad loaves here. That sugar? Just enough to caramelize the edges without overpowering.
- Weeknight Hero: Between us, this is my go-to when I’m too tired to fuss. Toss a few rosemary sprigs in the dough, bake it, and suddenly you’ve got dinner and bread. Zero guilt, all flavor.
- Fridge Goldmine: Here’s what sold me—it stays fresh for days, so I bake one batch and use it for sandwiches, toast, or even croutons. Plus, that extra-virgin olive oil? It’s the one ingredient that makes everything taste like a vacation.
Instructions for Lidia's focaccia bread recipe
Here's how to make this rich, airy focaccia with a golden crust and herby aroma that'll make your kitchen smell incredible.
Activate the Yeast and Mix the Dough
In a large bowl, combine the 1.25 cups warm water (about 110°F), 1 tbsp granulated sugar, and 0.25 oz active dry yeast. Let it sit for 5-10 minutes until foamy—this means your yeast is alive and ready to work. If it doesn't bubble, your yeast might be dead, and you'll need to start over.
Add the 4 cups all-purpose flour and 1.5 tsp coarse sea salt to the bowl. Using a wooden spoon, stir until a shaggy dough forms. Then, drizzle in 1.5 cups extra-virgin olive oil while mixing. The dough will be sticky and loose—this is normal. Once combined, turn it out onto a lightly floured surface and knead for 5 minutes until smooth and elastic. If it feels too sticky, wet your hands slightly to prevent sticking, but don't add extra flour.
Let the Dough Rise Until Doubled
Place the dough back in the bowl, cover it loosely with a clean kitchen towel, and let it rise in a warm spot for 1-2 hours until it puffs up and nearly doubles in size. You'll know it's ready when you poke it gently and the indentation stays put—this means the dough has enough air to create that signature focaccia texture.
While the dough rises, preheat your oven to 425°F. This high temperature will give you that crispy, golden crust we're after. If your dough rises too quickly (in under an hour), it might be too warm in your kitchen. Move it to a cooler spot to slow the process—rushing this step can make your focaccia dense instead of light and airy.
Shape and Dimple the Dough
Once the dough has risen, transfer it to a 9x13-inch baking pan that's been lightly greased with olive oil. Wet your hands slightly and press the dough evenly into the pan, stretching it to fit the corners. The dough should be about ½-inch thick—don't worry if it doesn't look perfect, as focaccia is forgiving.
Here's where the magic happens: use your fingertips to dimple the dough all over, creating those classic focaccia pockets. Press down gently but firmly—you want indentations about ½-inch apart. This step isn't just for looks; it helps the olive oil pool in the dimples and creates those crispy, golden bubbles when baked.
Bake Until Golden and Crispy
Drizzle the dough generously with the remaining olive oil, about 2-3 tablespoons, then sprinkle evenly with the 0.25 cup chopped fresh rosemary and 4 minced garlic cloves. Press the herbs lightly into the dough so they stick. Bake for 20-25 minutes until the crust is deep golden brown and the edges pull away slightly from the pan.
For the final touch, sprinkle the 1.5 tsp coarse sea salt evenly over the top while the focaccia is still hot out of the oven. This is the moment that matters—the salt melts slightly into the crust, creating those beautiful, crispy salt crystals. Let it cool for 10 minutes before slicing, as this allows the juices to redistribute and makes for a more tender bite.
Finish with Egg Wash (Optional but Recommended)
While the focaccia is still warm, beat the 2 whole large eggs in a small bowl. Brush the beaten eggs lightly over the top of the focaccia, focusing on the crust. Return it to the oven for 2-3 minutes until the egg wash turns golden and slightly crispy. This step adds a beautiful sheen and extra richness to the crust.
Let the focaccia cool completely before slicing—this ensures clean cuts and prevents it from falling apart. Store any leftovers wrapped in plastic at room temperature for up to 3 days, or freeze for up to 3 months. The flavor only gets better as it sits, soaking up all those olive oil aromas.
Pro Tips For Making Lidia'S Focaccia Bread
- USE COLD WATER FOR YEAST: I learned this the hard way—when the water hits 110°F, the yeast gets lazy and takes forever to activate. For Lidia’s recipe, use water that’s lukewarm to the touch (about 85°F), not the "just off the boil" kind. If you’re unsure, dip your finger in: it should feel like a warm bath, not a sauna.
- STRETCH THE DOUGH LIKE Taffy: This isn’t the prettiest method, but it’s the tastiest. After the first rise, Lidia’s recipe calls for stretching the dough by hand—don’t just poke it. Grab one side, pull it toward you hard, then let it snap back. Repeat in all directions until the dough resists like gum. This creates those signature air pockets without overworking the gluten.
- DIMENSION THE OIL POOL: That extra-virgin olive oil in the baking pan isn’t just for flavor—it’s for crust. Pour enough to coat the bottom (about 2 tablespoons) and let it pool slightly in the center. When you dimple the dough, those pockets will soak up the oil, giving you a crispy bottom and shatteringly crisp edges. (Yes, even if you’re impatient like me.)
- STOP DIMPLING WHEN IT’S TOUGH: The dough should feel firm but not rock-hard—like pressing your thumb into a ripe avocado. I used to dimple until my fingers ached, thinking more was better. But overworking the dough after the second rise collapses the air bubbles and makes the focaccia dense. Test it: if it springs back slowly when you press, you’re good. If it bounces back fast, stop.
Flavor customization for these flavors
Herb Variations
Swap the rosemary for fresh thyme or oregano—both pair beautifully with olive oil. For a Mediterranean twist, try fresh basil or dried oregano with sun-dried tomatoes scattered on top. I love using Penzeys Italian Seasoning (a blend of basil, oregano, and thyme) for a quick, aromatic topping. 🌿
Cheese Toppings
Add shredded Parmigiano-Reggiano or Pecorino Romano for a salty, umami kick. For a creamy twist, sprinkle ricotta cheese dollops before baking. I recommend using freshly grated cheese—pre-shredded varieties often contain anti-caking agents that prevent proper melting. 🧀
Sweet Variations
Transform this into a dessert focaccia by adding 1 tbsp cinnamon and ½ cup chopped walnuts to the dough. Top with honey and sliced almonds before baking. For a citrusy twist, drizzle with orange zest and a touch of honey glaze after baking. 🍯
Spicy Options
Kick up the heat with red pepper flakes or crushed chili flakes mixed into the dough. For a smoky flavor, add smoked paprika and top with crumbled feta and sliced jalapeños. I like using Penzeys Smoked Paprika for its deep, complex flavor. 🌶️
Savory Add-Ins
Incorporate caramelized onions or roasted cherry tomatoes into the dough for extra depth. For a protein boost, press thinly sliced prosciutto or salami into the dimples before baking. I often use San Marzano tomatoes for their sweet, rich flavor when roasted. 🍅
Dietary Swaps
For a gluten-free version, use King Arthur gluten-free flour blend and add 1 extra tbsp olive oil to compensate for the lack of gluten structure. For a vegan option, replace the eggs with 2 tbsp ground flaxseed mixed with 6 tbsp water.
Both versions still deliver that crispy, flavorful crust! 🌱
Nutrition facts
Frequently asked questions
Why does Lidia's focaccia need so much olive oil?
The high olive oil content is key to that signature crispy crust while keeping the interior tender. The oil creates steam during baking, which develops the airy texture, and pools in the dimples for extra richness. Use extra-virgin olive oil—it's worth the investment for that authentic Italian flavor.
Can I make this focaccia without a 9x13-inch pan?
Yes, but the shape will differ. Use a 10-inch cast-iron skillet for a round loaf or a loaf pan for a taller version. Just adjust the baking time—smaller pans may need 15-20 minutes while larger ones could take up to 30 minutes. The dough thickness should be ½-inch regardless of pan size.
What's the best way to tell when the focaccia is fully risen?
Gently press two fingers into the dough—if the indentation stays put (like a fingerprint), it's ready. The dough should also look puffy and nearly double in size. If it springs back quickly, let it rise 15-30 minutes longer. Overproofing can make the focaccia dense, so don't let it rise past this point.
Why did my focaccia turn out dense instead of light and airy?
Common causes include overproofing (dough rose too long), underproofing (didn't rise enough), or using too much flour during kneading. Also check your yeast—if it didn't bubble in the warm water, it was likely dead. For best results, measure flour by spooning and leveling, and avoid over-kneading. The dough should be sticky but manageable.
How can I make this recipe gluten-free or vegan?
For gluten-free, replace all-purpose flour with King Arthur gluten-free blend and add 1 extra tbsp olive oil. For vegan, swap the eggs with 2 tbsp ground flaxseed + 6 tbsp water. Both versions will have slightly different textures but still deliver that crispy crust. Test the dough consistency—gluten-free versions often need extra liquid.