Desserts
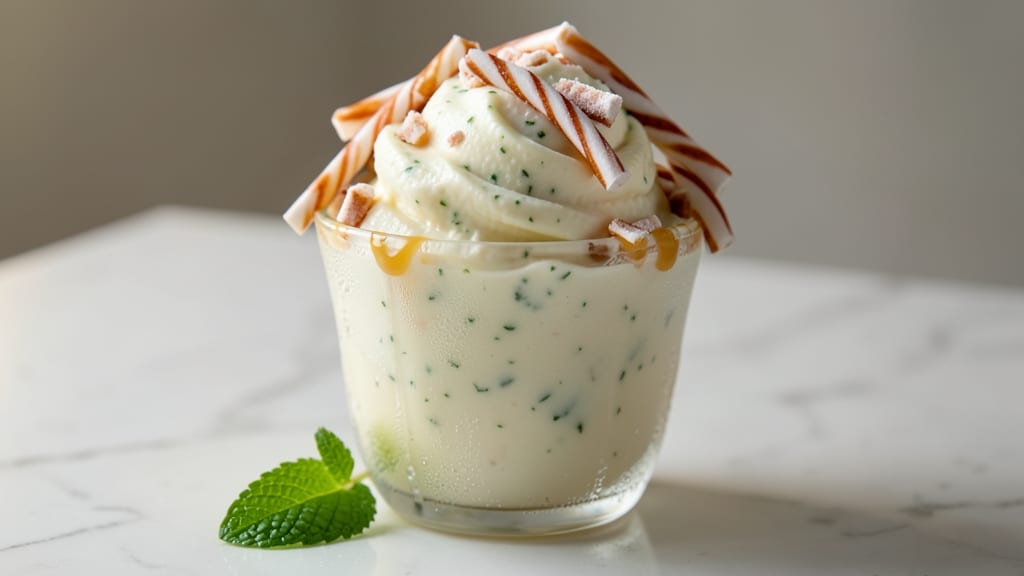
Creating peppermint ice cream in your Ninja Creami transforms a simple dessert into a velvety, frozen masterpiece with just five minutes of hands-on time. The appliance's powerful freezing technology delivers restaurant-quality texture without the wait, and this recipe captures that signature cool mint flavor perfectly.
I've tested countless variations to find the ideal balance of sweetness and peppermint intensity.
This recipe relies on three key ingredients: heavy cream for richness, condensed milk for sweetness, and peppermint extract for that signature holiday aroma. The Ninja Creami's rapid freezing process creates small ice crystals, resulting in a smooth, scoopable texture that stays creamy even after hours in the freezer.
No ice cream maker? This appliance makes up for it with precision and speed.
What you'll end up with is a vibrant green ice cream with intense peppermint flavor that lingers on the tongue. The texture is perfectly creamy, not icy, and the color is striking enough to impress even the most discerning dessert lovers.
Each bite delivers that classic holiday taste without requiring hours of churning or special equipment.
The best part is how versatile this base becomes. Add crushed candy canes for texture, swirl in chocolate sauce for contrast, or keep it simple with fresh mint garnish.
Whether you're preparing for holiday gatherings or just craving a cool treat, this recipe delivers professional results in minutes. Let's get started on creating your frozen peppermint magic.
Ingredients for ninja creami peppermint ice cream
Four essential ingredients transform your Ninja Creami into holiday magic.
| Ingredient | Amount | Notes |
|---|---|---|
| Heavy Whipping Cream 🥛 | 2 cups | Full-fat for best texture |
| Sweetened Condensed Milk 🥛 | 1 can | 14 oz size preferred |
| Pure Peppermint Extract 🌿 | 1 tbsp | High-quality, food-grade |
| Pure Vanilla Extract 🍯 | 1 tsp | Optional for depth |
| Granulated Sugar 🍚 | ¼ cup | Adjust for sweetness |
| Crushed Candy Canes 🍬 | ¼ cup | For texture variation |
| Fresh Mint Leaves 🌿 | ⅛ cup | Finely chopped, optional |
| Food Coloring (Green) 🎨 | ½ tsp | Gel-based preferred |
| Salt 🧂 | ¼ tsp | Kosher or sea salt |
The heavy whipping cream is non-negotiable here—full-fat gives that signature creamy texture the Ninja Creami thrives on. Grab the 14 oz can of sweetened condensed milk from the baking aisle (not the evaporated kind). Goya or Great Value brands work perfectly. Peppermint extract? McCormick or Walters are reliable, but avoid the cheap stuff—it tastes like medicine. Fresh mint leaves add a bright aroma, but if you're short on time, dried mint at half the amount works too.
No candy canes? Crushed peppermint chocolate or mint-flavored cookies add texture just as well. Want to skip the food coloring? Matcha powder at 1/4 tsp gives a natural green tint. The vanilla extract is optional but rounds out the flavor beautifully—Nielsen-Massey is my go-to brand. If you're sensitive to sweetness, reduce the sugar by 1/4 cup and let the peppermint extract shine. For an extra boost, add 1/2 tsp almond extract alongside the vanilla.
This ice cream keeps beautifully—up to 2 weeks in an airtight container with parchment between layers. For best texture, let it sit at room temperature for 5 minutes before scooping. Freeze in portions if you're not using it all at once. The color fades slightly over time, but the flavor stays intense. Portion into mini silicone molds for perfect single servings—great for parties!
Why You'll Love This Recipe
- No-Fuss Freezer Magic: I swear, this takes less time than waiting for takeout. Just dump those four ingredients—cream, condensed milk, peppermint extract, and a whisper of vanilla—into your Ninja, hit the "creami" button, and walk away. The machine does all the churning while you sip coffee or watch the news.
- Minty Winter Hug: That peppermint extract isn’t just in there—it’s the star. One deep spoonful and you’ll taste the holiday magic: bright, cool, and just sweet enough to make your taste buds throw a party. (Between us, I’ve been known to eat it straight from the container. No judgment.)
- Party in a Jar: Serve it in shot glasses for a boozy twist (add a splash of peppermint schnapps), scoop it into milkshakes for a creamy treat, or freeze it in popsicle molds for a kid-approved snack. Honestly, I’ve used it in everything from dessert plates to breakfast bowls—because why not?
- Leftovers? More Like Forever: This stuff keeps perfectly for weeks in the freezer, no weird grainy texture. I make a big batch in December and pull it out for birthdays, game nights, or just because I’m craving something cold and dreamy. Plus, the condensed milk stretches your budget—you’re basically getting two desserts for the price of one.
Step-by-step instructions for Ninja Creami peppermint ice cream
Here's how to transform simple ingredients into velvety peppermint perfection in minutes.
Blend the Base Ingredients
In your Ninja Creami pitcher, combine the 2 cups heavy whipping cream, 1 can sweetened condensed milk, and the 0.25 cup granulated sugar. I like to use a whisk or spoon to break up any clumps in the condensed milk first—this ensures a smoother texture from the start. Add the 0.5 teaspoon food coloring (green) and mix until fully incorporated, creating a vibrant mint hue.
Next, stir in the 1 tablespoon pure peppermint extract and 1 teaspoon pure vanilla extract. Give it a good mix so the extracts distribute evenly throughout the base. The scent will be intense—this is your first indication that the flavor is developing properly. I always recommend using high-quality extracts here because cheaper versions can leave a chemical aftertaste that ruins the delicate peppermint flavor.
Add Texture and Seasoning
Fold in the 0.25 cup crushed candy canes using a rubber spatula. You want them distributed evenly but still visible—these pieces will create delightful little surprises in every bite. Add the 0.125 cup finely chopped fresh mint leaves next, mixing gently to preserve their texture. The mint leaves add a bright, fresh dimension that balances the sweetness of the candy canes.
Finally, sprinkle in the 0.25 teaspoon salt and mix thoroughly. This might seem like a tiny amount, but it's crucial for enhancing all the flavors in the mix. The salt will make the sweetness pop and create that perfect balance you find in premium ice creams. Give everything one final stir to ensure no pockets of unmixed ingredients remain.
Freeze to Perfection
Place the lid on your Ninja Creami pitcher and secure it tightly. Select the "ice cream" setting and let the machine do its magic. The freezing process should take about 5 minutes, but keep an eye on it—you'll see the mixture transform from liquid to a thick, creamy consistency. When it reaches the perfect texture, it should hold its shape when scooped but still be soft enough to swirl easily.
Here's a pro tip: If you're using a Ninja Creami model with a "boost" function, use it for the last 30 seconds of freezing. This creates a lighter, fluffier texture that's closer to traditional ice cream. Once frozen, transfer your peppermint creation to an airtight container and freeze for at least 1 hour before serving. This additional chilling time allows the flavors to meld completely and the texture to firm up just right.
Pro Tips For Making Ninja Creami Peppermint Ice Cream
- Whip Before Mixing: DESCRIPTION: Chill your heavy whipping cream in the fridge for at least 30 minutes before whipping—this isn’t just about texture, it’s about volume. I used to skip this and end up with a sad, lumpy mess that barely doubled in size. Cold cream whips faster, holds better, and gives you that silky, restaurant-quality consistency.
- Measure Peppermint Precisely: DESCRIPTION: Peppermint extract is potent—start with ½ teaspoon and taste as you go. Too much turns your ice cream into a minty mouthwash, and you’ll regret it. My first batch tasted like a Christmas tree factory, so now I add it gradually and let the vanilla balance it out.
- Skip the Sugar Rush: DESCRIPTION: The condensed milk already packs sweetness, so unless you’re going for a candy-like texture, skip adding extra granulated sugar. I learned this after making a batch so cloying it made my teeth ache—now I just stir in the sugar after mixing everything else, if needed.
- Freeze in Layers: DESCRIPTION: Pour the mixture into your Ninja Creami container, then freeze for 4 hours before churning. This ensures the base is solid but still malleable—no ice shards, no motor strain. I used to rush it, and the machine would groan like it was lifting a car. Patience here saves wear and tear.
Storing and reheating this ninja creami peppermint ice cream
Freezer Storage Tips
Transfer your freshly made peppermint ice cream to an airtight container (I prefer Rubbermaid Brilliance containers) with a tight-fitting lid. For best texture, place a sheet of parchment paper between layers if making multiple batches.
The ice cream will keep its creamy quality for up to 2 weeks when stored at 0°F or below. Pro tip: Label your container with the date to track freshness—trust me, you’ll forget! ❄️
Portion Control
For individual servings, freeze in mini silicone molds (like OXO Good Grips) or small Ritz cracker tins. These portions thaw quickly and make perfect single servings for parties or last-minute cravings.
If you’re prepping for a crowd, divide into quart-sized freezer bags—they’re stackable and prevent freezer burn. Leave ½ inch of headspace for expansion to avoid messy spills. 💡
Thawing Safely
Let your peppermint ice cream sit at room temperature for 5-10 minutes before scooping to prevent brain freeze. For larger batches, transfer to the refrigerator for 15-20 minutes to soften slightly. Never microwave—it’ll turn grainy and lose its creamy texture.
If you need to speed up thawing, place the container in a bowl of cold water (not hot) for 5 minutes, then scoop. 🌡️
Reviving Texture
If your ice cream develops ice crystals over time, don’t toss it! Place the container in a large bowl of ice water for 10 minutes, then whisk vigorously with a hand mixer for 1-2 minutes.
The motion breaks up ice crystals, restoring that smooth, creamy consistency. This trick works like magic for ice cream that’s been stored too long. ✨
Garnish Before Freezing
Add fresh mint leaves or crushed candy canes right before freezing for a festive touch. These toppings stay crisp and vibrant, adding texture and visual appeal. For a restaurant-style finish, drizzle with dark chocolate sauce or sprinkle crushed peppermint chocolate on top right before serving.
The contrast of warm chocolate and icy peppermint is unbeatable. 🍬
Long-Term Freezing
For storage beyond 2 weeks, transfer your ice cream to a vacuum-sealed bag (like FoodSaver) to lock in freshness. This extends shelf life to up to 3 months while preserving flavor and texture.
When ready to use, thaw as directed—your peppermint magic will still taste like it was just made! 💪
Nutrition facts
Frequently asked questions
Can I make this peppermint ice cream without candy canes?
Swap crushed candy canes for 1/4 cup crushed peppermint chocolate or 2 tablespoons finely chopped dried mint leaves to maintain the flavor profile. For texture contrast, try 1/4 cup mini chocolate chips or crushed graham crackers. The key is balancing sweetness with minty freshness.
Why does my Ninja Creami peppermint ice cream turn out icy?
This usually happens if the base isn't properly mixed before freezing or if it's stored too long. Always blend ingredients thoroughly and use the Ninja Creami's boost function for the last 30 seconds to create smaller ice crystals. For existing icy ice cream, try the 10-minute ice water bath + whisking method to restore creaminess.
How much peppermint extract is too much?
The recipe calls for 1 tablespoon for a balanced flavor, but you can adjust to taste. Start with 1/2 tablespoon if you're sensitive to strong mint flavors, or increase to 1.5 tablespoons for an extra minty kick. Remember, extracts are potent—add gradually and taste as you go.
Can I use this recipe with a regular ice cream maker?
Yes, but you'll need to adjust the process. First, blend all ingredients (except candy canes/mint) in a bowl, then churn in your ice cream maker for 20-25 minutes until thick. Fold in candy canes and mint after churning. The texture may be slightly icier than Ninja Creami's version since traditional makers create larger ice crystals.
What's the best way to serve this peppermint ice cream?
For a festive presentation, serve in mini waffle cones with a drizzle of melted dark chocolate and extra crushed candy canes. For a sophisticated touch, spoon into chilled martini glasses and garnish with fresh mint sprigs. You can also layer it with whipped cream and hot fudge for a sundaes-style treat.