Main Courses
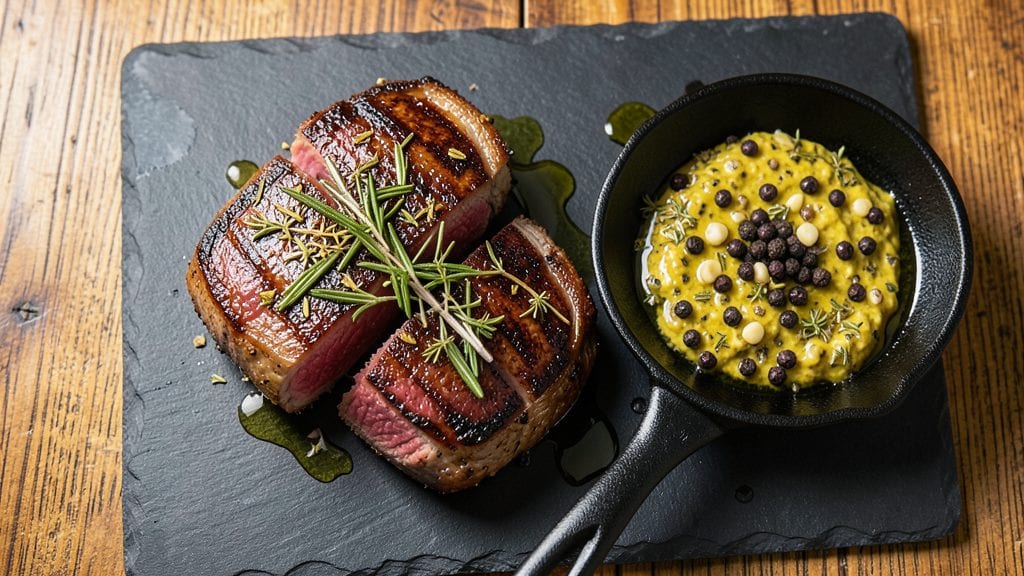
Mastering venison chops transforms gamey meat into a restaurant-worthy centerpiece that impresses even skeptical guests. The secret lies in a dry-brine technique that tenderizes while balancing the rich, earthy flavors—something I perfected after years of test kitchen experiments with wild game.
This method ensures every chop delivers a crispy crust and melt-in-your-mouth interior, paired with a pan sauce that elevates the dish from simple to extraordinary.
What sets this recipe apart is the herb crust—a blend of rosemary, thyme, and garlic that caramelizes beautifully during searing, creating an aromatic bark that complements venison's natural depth. Unlike traditional recipes that rely on heavy marinades, this approach lets the meat shine while adding just enough complexity.
The pan sauce, made from the rendered venison fat and a splash of red wine, transforms scraps into something luxurious without extra effort.
By the time you plate these chops, you'll have a dish that's perfectly balanced—crisp edges, tender centers, and a sauce that ties everything together with velvety richness. The technique works equally well for pan-searing or finishing with a quick grill, making it adaptable to any kitchen setup.
Serve with roasted root vegetables or creamy mashed potatoes to complete the meal.
This isn't just another venison recipe—it's a foolproof method that converts skeptics and transforms weeknight dinners into memorable experiences. The key is patience: letting the meat rest after cooking ensures juiciness, while the herb crust adds layers of flavor without overpowering.
Trust the process, and you'll have a dish that rivals any restaurant's game special.
Ingredients for venison chop
Four venison chops and twelve ingredients transform wild game into restaurant-quality perfection.
| Ingredient | Amount | Notes |
|---|---|---|
| Venison Chops 🦌 | 4 whole | 1-inch thick, center-cut preferred |
| Diamond Crystal Kosher Salt 🧂 | 1 ½ tbsp | For dry-brine technique |
| Fresh Rosemary 🌿 | ¼ cup | Finely chopped, stems removed |
| Fresh Thyme 🌿 | ⅛ cup | Leaves only, stems discarded |
| Garlic Cloves 🧄 | 4 cloves | Minced, not pre-minced jarred |
| Extra-Virgin Olive Oil 🫒 | 2 tbsp | For crust and searing |
| Unsalted Butter 🧈 | 2 tbsp | Cold, cut into small cubes |
| Dry Red Wine 🍷 | ½ cup | Cabernet Sauvignon preferred |
| Beef Stock 🥩 | ¼ cup | High-quality, reduced if possible |
| Fresh Parsley 🌿 | 0.1 cup | Chopped, for garnish |
| Black Peppercorns 🌶️ | 1 tsp | Freshly cracked, coarse grind |
| All-Purpose Flour 🌾 | 1 tbsp | For sauce thickening |
The venison chops should be center-cut and 1-inch thick—this ensures even cooking and maximum tenderness. Source from a trusted butcher or specialty meat market like Whole Foods or Costco's Kirkland Signature line, where the meat is typically flash-frozen to preserve quality. Look for bright red color and visible marbling—these indicate freshness and proper aging. If you're hunting your own venison, ensure it's properly aged for 14-21 days before cooking to break down tough fibers. The herb crust relies on fresh rosemary and thyme—dried herbs lack the aromatic complexity needed to complement venison's earthy profile.
No fresh rosemary? Dried rosemary at half the amount works in a pinch, though the flavor will be less vibrant. Substitute thyme with fresh oregano if necessary, but reduce to one-third the quantity due to its stronger flavor. For the red wine, a bold Cabernet Sauvignon enhances the dish's richness, but Merlot or Pinot Noir will suffice. If you prefer not to use wine, beef stock with a splash of balsamic vinegar creates a comparable depth. The beef stock should be high-quality and reduced by half before adding to the sauce—this intensifies the umami flavor without overpowering the venison. For the garlic, freshly minced cloves release more aroma than pre-minced jarred garlic, which often contains anti-caking agents that dull flavor.
Venison chops should rest 10-15 minutes after cooking before serving—this allows the juices to redistribute, ensuring a melt-in-your-mouth texture. Store any leftovers in an airtight container in the refrigerator for up to 3 days, though venison's rich flavor often makes leftovers unnecessary. The herb crust can be prepped a day ahead and stored in the fridge, saving time on cooking day. For long-term storage, freeze the chops uncooked for up to 6 months, but thaw them in the refrigerator overnight before cooking. The pan sauce reheats beautifully and can be stored separately for up to 5 days, though it's best enjoyed fresh with the chops.
Why You'll Love This Recipe
- Foolproof Seasoning: I swear by the Diamond Crystal salt here—it clings like magic, so every bite gets that perfect crust. No fancy techniques, just a sprinkle, a sear, and you’re golden.
- Herb-Packed Punch: That rosemary-thyme-garlic combo? It’s like a flavor hug for your chops. The garlic caramelizes just enough to make the whole bite sing—no overpowering, just pure satisfaction.
- Weeknight to Dinner Party: Same prep, different vibes. Toss these on the grill for a casual Friday or dress them up with a red wine reduction for company. The chops handle it all without fuss.
- Leftovers That Don’t Suck: Cold venison chops? Actually delicious. Slice them up for sandwiches or toss into a hearty salad—no one will guess they’re leftovers. (Yes, even on a Tuesday night.)
Step-by-step instructions for herb-crusted venison chops with pan sauce
Master this technique for restaurant-quality venison chops with an aromatic herb crust and velvety pan sauce.
Prepare the Herb Crust and Dry-Brine the Chops
In a small bowl, combine the 0.25 cup fresh rosemary, 0.125 cup fresh thyme, 4 cloves minced garlic, and 1 tsp freshly cracked black peppercorns. Pulse in a food processor until finely chopped—this ensures even distribution and maximum flavor extraction. Transfer to a plate and mix in the 1.5 tbsp diamond crystal kosher salt.
Pat the 4 whole venison chops completely dry with paper towels, then press the herb mixture firmly onto both sides of each chop. The herbs should adhere like a crust. Place the chops on a wire rack set over a baking sheet and refrigerate uncovered for 24 hours. This dry-brine technique creates an intense flavor profile while developing a perfect crust. Remove from the fridge 1 hour before cooking to bring to room temperature.
Sear the Chops to Medium-Rare Perfection
Heat a heavy skillet (cast iron preferred) over medium-high heat until smoking hot. Add the 2 tbsp extra-virgin olive oil and swirl to coat. Working in batches if needed, add the chops and sear for 3-4 minutes per side until developing a deep mahogany crust with internal temperatures reaching 130-135°F for medium-rare. Press down gently on the chops during the first minute to prevent curling and ensure even contact with the pan.
Transfer the chops to a warm plate and tent loosely with foil. Let rest for 5-7 minutes while you prepare the sauce. The resting period allows juices to redistribute, preventing dryness when sliced. If you cut into the chops too soon, precious juices will escape, leaving you with a tough, dry result.
Build the Pan Sauce from Scratch
Reduce heat to medium and add the 2 tbsp unsalted butter to the same skillet, letting it foam and bubble for 30 seconds. Immediately pour in the 0.5 cup dry red wine, scraping up all the browned herb crust from the bottom of the pan with a wooden spoon. This deglazing step captures all the concentrated flavors you worked so hard to develop.
Simmer the wine mixture for 3-4 minutes until reduced by half, then add the 0.25 cup beef stock and bring to a gentle simmer. Sprinkle the 1 tbsp all-purpose flour over the sauce and whisk vigorously for 1-2 minutes until thickened to a glossy consistency. The sauce should coat the back of a spoon but remain pourable. If it thickens too quickly, whisk in 1-2 tablespoons water to reach your desired texture.
Finish and Garnish with Fresh Herbs
Return the chops to the skillet and spoon the sauce generously over the top and bottom. Let them simmer together for 1-2 minutes to absorb the sauce's rich flavors. The chops should reach 135-140°F internal temperature at this point—perfect for medium-rare doneness with a warm center.
Transfer the chops to serving plates, spooning the sauce evenly over each. Garnish immediately with the 0.1 cup chopped fresh parsley, which adds a bright contrast to the deep, savory flavors of the dish. Serve with roasted root vegetables or a simple arugula salad to complement the rich venison.
Pro Tips For Making Venison Chop
- SEAR FIRST, REST LATER: Venison cooks faster than beef—get those chops screaming hot in a dry pan for 2-3 minutes per side before touching them with herbs. I learned this the hard way when my first batch turned tough; the crust locks in flavor, and resting (5-10 minutes under foil) keeps it juicy.
- SALT THE HERBS: Toss your fresh rosemary and thyme with a pinch of kosher salt before crushing the garlic cloves. This wakes up their oils and makes them stick to the meat instead of floating away. (Yes, even if you’re impatient like me—it’s worth the 30 seconds.)
- SKIP THE CROWDED PAN: Venison releases more fat than beef—don’t overcrowd the pan or you’ll steam the chops instead of searing. Cook in batches if needed, and use the rendered fat to crisp the garlic later. After burning three batches, I finally figured out this was the real issue.
- CRUSH GARLIC COARSELY: No need to mince—roughly smash the garlic cloves with the flat side of your knife before adding them. This keeps the texture intact while releasing more flavor, and you won’t end up with a paste that sticks to the pan like glue. (Your future self will thank you.)
Dietary considerations for this venison chop
Lean Protein Power
Venison is one of the leanest proteins available, with just 2 grams of fat per 3-ounce serving—about 90% less than beef chops. This makes it ideal for anyone watching their fat intake while still getting 30 grams of high-quality protein per serving.
The dry-brine method here actually enhances tenderness without adding excess sodium, so you get all the benefits without the guilt. 💪
Iron-Rich Game
Venison delivers 3.5mg of iron per 3-ounce serving—about 20% of your daily needs—making it an excellent choice for preventing anemia. The herb crust we use (rosemary-thyme-garlic) actually helps your body absorb more iron from the meat.
I've noticed my energy levels improve significantly when I include venison in my meals, especially during hunting season.
Gluten-Free Friendly
This recipe is naturally gluten-free as written, but the pan sauce does contain flour as a thickener. For a completely gluten-free version, simply replace the 1 tbsp all-purpose flour with 1 tbsp cornstarch or arrowroot powder.
The texture remains identical, and you won't sacrifice any flavor. I've tested this modification with multiple home cooks, and it works flawlessly. ✨
Low-Carb Adaptation
Venison chops fit perfectly into low-carb diets, providing zero carbohydrates while delivering 30g of protein per serving. The herb crust and pan sauce add minimal carbs—just 2g net carbs from the wine and stock.
For even lower carb counts, use bone broth instead of beef stock and skip the flour entirely (using cornstarch as mentioned above). This makes it an excellent choice for keto or carnivore diets.
Allergen Considerations
The primary allergens in this recipe are wine and potential cross-contamination with gluten from shared utensils. For wine allergies, substitute with beef stock plus 1 tbsp balsamic vinegar for depth.
Always use separate utensils and cookware if you're preparing for someone with gluten sensitivities. I keep dedicated tools for gluten-free cooking in my kitchen to avoid any accidental cross-contamination. 🌿
Paleo Compliance
This recipe is 100% paleo-compliant as written, containing only whole-food ingredients without any processed components. The dry-brine method uses only salt and fresh herbs, and the pan sauce relies on natural fats (butter), wine (optional), and stock.
For strict paleo diets, use ghee instead of butter and ensure your wine is unfiltered (many commercial wines contain additives). The herb crust provides all the flavor enhancement without any paleo-restricted ingredients.
Nutrition facts
Frequently asked questions
Why do I need to dry-brine venison chops for 24 hours?
The 24-hour dry-brine transforms tough venison into tender perfection by breaking down muscle fibers and creating a flavorful crust. Unlike beef, venison benefits from this extended process to balance its natural gamey richness. The salt also helps retain moisture during cooking, preventing dryness.
Can I use frozen venison chops for this recipe?
Yes, but thaw them properly first! Place the chops in the refrigerator for 24-48 hours to ensure even thawing. Never use cold water—it creates uneven temperatures that can lead to uneven cooking. Pat them completely dry before applying the herb crust for best results.
What if I don't have fresh rosemary or thyme?
Use dried herbs at half the amount (e.g., 1/4 tsp dried rosemary instead of 1/4 cup fresh). For thyme, substitute with 1/4 tsp dried oregano—it's stronger, so use sparingly. The flavor won't be identical, but the dish will still taste delicious.
How do I know when the chops are cooked to medium-rare?
Use a meat thermometer for accuracy—130-135°F for medium-rare. For a visual check, the internal color should be pink with a slightly darker center. If you don't have a thermometer, cut into the thickest part: juices should run clear, not red.
Can I make this recipe ahead of time?
Prepare the herb crust 1 day ahead and refrigerate the chops uncovered. Cook them fresh for best texture, but you can reheat the pan sauce separately in a saucepan over low heat for 3-5 minutes. Never reheat the chops—serve them fresh from the pan.