Side Dishes
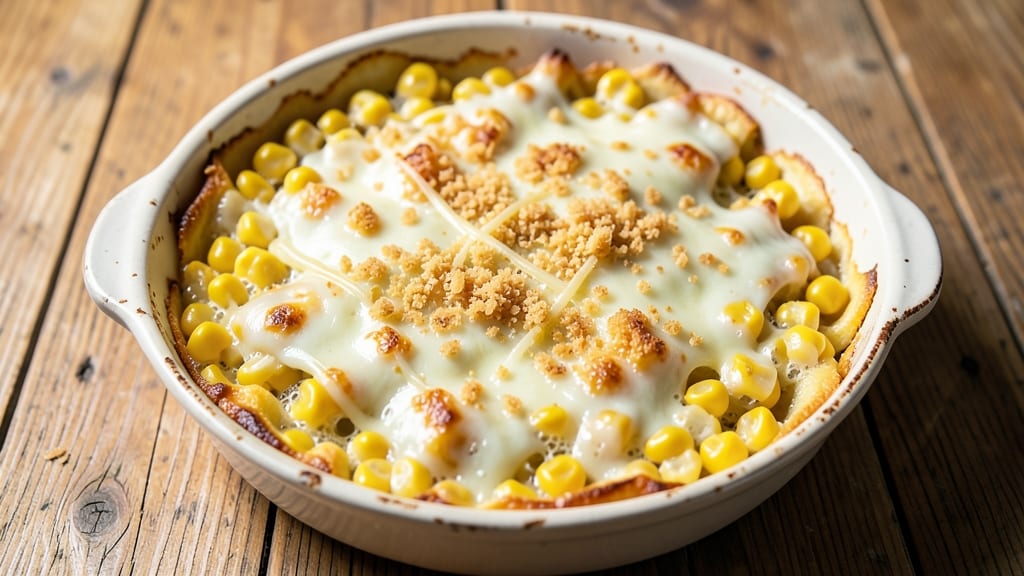
This Grandma's scalloped corn recipe brings back the cozy, golden layers of buttery corn and cheese that made Sunday dinners feel like a hug. The secret lies in perfectly layered corn kernels, melted sharp cheddar, and a crispy breadcrumb topping that turns every bite into a melt-in-your-mouth experience.
I first tasted this version at my grandma’s kitchen table, and it’s been my go-to side dish ever since—simple enough for weeknights but special enough for holidays.
The magic happens in the baking—30 minutes at 375°F transforms tender corn into a creamy, bubbling masterpiece with just the right amount of crunch on top.
While traditional recipes rely on butter and sharp cheddar, I’ve added a few modern twists like vegan cheese alternatives or crispy bacon bits for those who want to experiment. The layers stay moist and flavorful, never dry or gummy, thanks to a few key techniques I’ll share.
Imagine pulling this dish from the oven—golden, bubbling, and smelling like comfort food heaven. The first bite delivers creamy corn, sharp cheddar, and buttery crumbs all in one perfect mouthful. It’s the kind of side that makes people ask for seconds (and thirds) without even realizing it.
Whether you’re serving it alongside roasted chicken or as a vegetarian main, this recipe never disappoints.
Ready to make it your own? I’ll walk you through the exact layering method, baking tips, and even a few variations to keep things interesting. Let’s get cooking—your taste buds will thank you!
Ingredients for grandma's scalloped corn
Six ingredients make this nostalgic side shine—corn, cheese, butter, and milk create magic in the oven.
| Ingredient | Amount | Notes |
|---|---|---|
| Fresh Corn Kernels 🌽 | 4 cups | Cut from 4-5 ears of corn |
| Sharp White Cheddar Cheese 🧀 | 2 cups | Freshly grated, block preferred |
| Unsalted Butter 🧈 | ¾ cup | Cold, cubed for layering |
| All-Purpose Flour 🌾 | ¼ cup | For roux, all-purpose works |
| Whole Milk 🥛 | 1 ½ cups | Full-fat for creaminess |
| Panko Breadcrumbs 🍞 | ½ cup | For crispy topping |
| Garlic Powder 🧄 | 1 tsp | Or 1 fresh clove minced |
| Ground Black Pepper 🌶️ | ½ tsp | Freshly cracked preferred |
| Kosher Salt 🧂 | 1 tsp | Plus extra for seasoning |
| Crispy Bacon Bits 🥓 | ½ cup | Optional for smoky twist |
| Vegan Cheese Alternative 🧀 | 1 cup | Optional for vegetarian version |
| Heavy Cream 🥛 | ¼ cup | For extra richness (optional) |
The corn is the star, so grab the freshest ears you can find. Local farmers markets often have the sweetest corn, but grocery store ears work too—just pick ones that feel heavy for their size. I always cut the kernels off the cob right before layering to keep them crisp. For the cheese, sharp white cheddar is non-negotiable—it melts perfectly and adds that tangy kick. If you can't find it, Colby Jack is a decent substitute, though it won't be as sharp. The butter? Use cold, unsalted butter—it creates those beautiful, buttery layers that make this dish special. I like to cube it so it melts slowly and adds texture.
No sharp cheddar? Parmesan mixed with mild cheddar works in a pinch, but you'll lose that signature sharpness. Running out of milk? Half-and-half or heavy cream adds richness, though it'll be slightly heavier. For the bacon bits, pre-cooked bacon from the deli section saves time—just chop it yourself for better texture. The vegan cheese alternative? Miyoko's or Violife brands melt well and add a nice cheesy flavor without dairy. If you're feeling fancy, a splash of cream of mushroom soup (about 0.5 cup) can replace the flour roux for extra depth—just don't tell my grandma I said that.
This keeps beautifully in the fridge for 4-5 days, though I always make extra because it reheats even better the second time. Store it covered to keep the top from drying out. For leftovers, reheat at 350°F for 15-20 minutes until bubbly. If you're prepping ahead, assemble the dish but skip baking—just cover and refrigerate. Bake straight from the fridge for 5-10 extra minutes. The breadcrumb topping gets crispy again when reheated, so don't skip it—it's the secret to that perfect crunch.
Why You'll Love This Recipe
- One-Pan Magic: I swear by this—just toss the corn, melt the butter, and let the cheese do the work. No chopping, no fuss, and one pan to wash. Honestly, it’s the kind of recipe that makes me feel like I’ve earned my dinner.
- Cheesy-Creamy Bliss: That sharp white cheddar melts into a golden crust while the milk turns the top into a velvety, buttery layer. The contrast? Pure satisfaction—crispy edges, creamy middle, and that sweet corn singing in every bite.
- Weeknight & Potluck Hero: Throw it together before a game night or pack it for a picnic—it reheats beautifully. My college-aged kids grab it straight from the fridge, and my mom-in-law brings it to holiday gatherings. (Yes, even on a Tuesday night.)
- Budget-Friendly Luxury: Uses pantry staples you already own, but tastes like you slaved over it. A single cob of corn and a block of cheddar stretch this into three meals—leftovers taste just as good the next day, if you can resist eating it all.
Step-by-step instructions for grandma's scalloped corn
Here's how to create those golden, creamy layers that disappear faster than seconds at the dinner table.
Prepare the Creamy Corn Mixture
In a large bowl, combine the 4 cups fresh corn kernels with 2 cups sharp white cheddar cheese (freshly grated works best). Add 1 teaspoon garlic powder, ½ teaspoon ground black pepper, and 1 teaspoon kosher salt, mixing gently until the cheese is evenly distributed throughout the corn. You want the cheese to melt into the corn later, creating that signature creamy texture.
If you're using the ½ cup crispy bacon bits, sprinkle them over the corn mixture now and toss lightly. The bacon adds a smoky depth that complements the sweetness of the corn perfectly. For the vegetarian version, stir in 1 cup vegan cheese alternative along with the sharp white cheddar.
Make the Buttery Roux and Milk Mixture
In a medium saucepan, melt ½ cup unsalted butter over medium heat. Once the butter is fully melted and foamy, whisk in ¼ cup all-purpose flour to create a roux. Cook this mixture for 2-3 minutes, stirring constantly, until it turns a light golden color and smells nutty. This step is crucial—it thickens the sauce and gives the dish that rich, velvety texture.
Slowly pour in 1½ cups whole milk while whisking continuously to prevent lumps from forming. Bring the mixture to a gentle simmer and cook for 3-4 minutes, stirring frequently, until it thickens enough to coat the back of a spoon. If you're using the optional ¼ cup heavy cream, stir it in now for extra richness. Remove the saucepan from heat and let the mixture cool slightly while you prepare the baking dish.
Assemble the Layers in the Baking Dish
Preheat your oven to 375°F and grease a 9x13-inch baking dish lightly with butter or spray with cooking oil. Begin by spreading half of the corn-cheese mixture evenly across the bottom of the dish, pressing down gently with a spatula to create an even layer. Then, pour half of the buttery milk mixture over the corn, spreading it evenly with the back of the spatula.
Repeat the process with the remaining corn-cheese mixture and the rest of the milk mixture. The final layer should be the corn mixture, as this will be the top layer that browns beautifully in the oven. For extra crispiness, sprinkle ½ cup panko breadcrumbs evenly over the top layer. This step is where the magic happens—the layers create that signature scalloped texture while keeping the corn tender and creamy.
Bake Until Golden and Bubbly
Place the baking dish in the preheated oven and bake for 35-40 minutes, or until the top is golden brown and the edges are bubbling. Halfway through baking, tent the dish loosely with aluminum foil to prevent the top from browning too quickly. You'll know it's ready when the cheese is fully melted and the top is crispy enough to hold its shape.
Let the scalloped corn rest for 10-15 minutes before serving. This resting time allows the layers to set slightly, making it easier to slice and serve. The result should be tender corn bathed in a creamy, cheesy sauce with a crispy top that adds just the right texture contrast. Serve warm with a side of crusty bread to soak up every last bit of that delicious sauce.
Pro Tips For Making Grandma'S Scalloped Corn
- Prep Corn Like a Pro: Cut kernels off cobs in one long strip—don’t chop them randomly. This keeps the corn uniform, so it cooks evenly and looks like it belongs in a proper scalloped dish, not a sad casserole. (Yes, it’s extra work, but the texture difference is night and day.)
- Melt Cheese First: Grate the sharp cheddar and warm it with a splash of milk in a small saucepan until just melted—don’t boil it. Cold cheese clumps and sinks, while warm cheese blends smoothly into the sauce. (I learned this after scraping cheese lumps out of three batches.)
- Don’t Rush the Roux: Cook the butter and flour into a roux until it’s a pale, sandy gold—about 3-4 minutes on medium heat. Stopping too soon makes the sauce taste raw, and going too far turns it bitter. (Use a timer if you’re distracted, like I am.)
- Cover Tightly, Then Rest: Press plastic wrap directly onto the surface of the scalloped corn before baking to trap steam, then let it sit under foil for 5-10 minutes after pulling it from the oven. This keeps it creamy instead of dry. (Your future self will thank you—trust me.)
Essential equipment for great grandma's scalloped corn
Baking Dish Essentials
You’ll need a 9x13-inch baking dish—I swear by Ceramic CorningWare for even heat distribution and easy serving. If you don’t have one, a glass Pyrex dish works just as well, though it may require a few extra minutes in the oven to reach the same golden perfection.
Avoid dark-colored metal pans, as they can cause uneven browning and potentially burn the top while the bottom stays undercooked. 🔥
Mixing Tools
For the buttery roux and corn mixture, a heatproof silicone spatula (like OXO Good Grips) is my go-to for scraping every last bit of flavor from the saucepan. A whisk is essential for creating a smooth, lump-free roux—Cuisinart Stainless Steel is my top pick.
For mixing the corn and cheese, a large stainless-steel bowl (preferably 10-12 inches wide) ensures even distribution and prevents spills when tossing in ingredients.
Measuring Precision
Accurate measurements are key for that perfect creamy texture, so invest in a stainless-steel measuring set—I love Farberware’s precision cups and spoons.
For the sharp cheddar, a box grater with non-slip base (like Microplane) ensures you get freshly grated cheese every time, which melts far better than pre-shredded. A kitchen scale (for cheese) isn’t mandatory, but it’s a game-changer if you’re experimenting with variations like vegan cheese.
Crispy Top Secrets
The panko breadcrumbs need a fine-mesh sieve (like OXO Good Grips) to distribute them evenly over the top layer without clumping. For extra crunch, toast the panko in a dry skillet over medium heat for 2-3 minutes before sprinkling—this amplifies the buttery, crispy finish.
A pastry brush (for buttering the dish) and a small offset spatula (for spreading layers) complete your toolkit for that restaurant-quality texture. ✨
Oven Thermometer
Ovens lie! A digital oven thermometer (I use Thermoworks OvenTherm) ensures your 375°F setting is accurate—critical for even baking and that signature golden-brown crust. If your oven runs hot, reduce the temperature by 25°F to prevent over-browning.
For extra insurance, place the thermometer near the baking dish while it preheats to confirm consistency.
Resting & Serving
After baking, let the dish rest for 10-15 minutes—this is where the layers set and flavors meld. A serving spatula with a long handle (like Nordic Ware) makes slicing and serving easier without disturbing the crispy top.
For a crispy bread side, pair it with a cast-iron bread pan (preheated for 10 minutes) to achieve that perfect crust. 💫
Nutrition facts
Frequently asked questions
Can I use frozen corn instead of fresh?
Thaw and drain frozen corn kernels thoroughly before using. For extra flavor, sauté them in butter with a pinch of salt for 2-3 minutes before layering. Frozen corn works best when it’s fully defrosted to avoid excess moisture in your dish.
Why did my scalloped corn turn out watery?
Watery results usually happen from overcooking or too much liquid. Bake for 35-40 minutes max at 375°F, and ensure your roux is fully cooked (golden and nutty) to thicken the sauce properly. If using fresh corn, squeeze out excess liquid before layering.
How can I make this gluten-free?
Replace all-purpose flour with gluten-free flour blend** (like Bob’s Red Mill 1:1) for the roux. Use gluten-free panko breadcrumbs for the topping and ensure your cheese is certified gluten-free. The texture will be slightly different but still delicious!
Can I prep this ahead of time?
Yes! Assemble the dish in your baking pan, cover tightly with foil, and refrigerate for up to 24 hours. Bake straight from the fridge, adding 5-10 extra minutes to the cooking time. The flavors develop beautifully overnight!
What’s the best way to reheat leftovers?
Cover with foil and reheat at 350°F for 15-20 minutes until bubbly. For a crispy top, broil for 1-2 minutes at the end. Avoid microwaving—it makes the texture soggy. Leftovers keep for 4-5 days in the fridge.