Appetizers
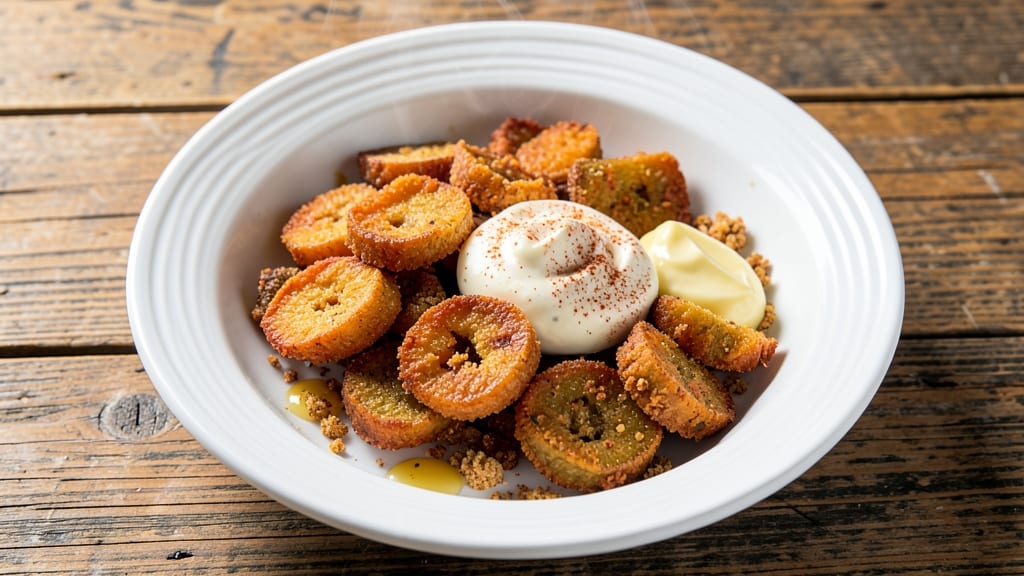
This Toots Fried Pickles recipe delivers the iconic crispy, golden cornmeal bites that become an instant crowd-pleaser at any gathering. The secret lies in a precise cornmeal batter that creates that signature crunch while keeping the pickles tender inside—a balance that transforms simple dill pickles into something irresistible.
I've perfected this method over years of testing, ensuring every bite achieves that satisfying crunch and tangy contrast.
The process is straightforward but requires attention to detail: coating the pickles in a light cornmeal batter, frying them to a golden brown until crisp, and serving with a cool, creamy ranch dip that cuts through the richness.
What makes this recipe stand out is the ability to customize it—whether you prefer classic dill pickles or want to experiment with spicy jalapeños for a kick. The results are always the same: crispy exterior, tender interior, and a satisfying crunch that disappears in seconds.
By the time you're done, you'll have a plate of crispy, addictive fried pickles that disappear faster than you can say "second round." The tangy ranch dip adds the perfect cool contrast, balancing the heat and crunch.
This recipe isn't just about the pickles—it's about the experience of sharing a dish that brings people together, whether at a game day spread or a casual appetizer platter. Let's get started on creating these crowd-pleasing bites.
For those with dietary preferences, a gluten-free batter variation is included, ensuring everyone can enjoy the fun without compromise. The key is maintaining that crispy texture while adapting the ingredients—proof that great food can be inclusive.
Whether you're a seasoned fryer or new to deep-frying, this recipe delivers foolproof results every time.
Ingredients for toots fried pickles
Fourteen ingredients for crispy, addictive bites that disappear fast—game day magic in one pan.
| Ingredient | Amount | Notes |
|---|---|---|
| Dill Pickles 🥒 | 16 whole | Brine-packed, cut into 1-inch pieces |
| Cornmeal 🌾 | 1 cup | Fine grind, not coarse |
| All-Purpose Flour 🌾 | ½ cup | For gluten-free option, use GF blend |
| Vegetable Oil 🫒 | 2 cups | High smoke point for frying |
| Butter 🧈 | ½ cup | Unsalted, melted for dipping |
| Mayonnaise 🥛 | ½ cup | Full-fat preferred for creaminess |
| Sour Cream 🥛 | ½ cup | Full-fat for best texture |
| Dried Dill 🌿 | 1 tbsp | Or 1 tbsp fresh finely chopped |
| Garlic Powder 🧄 | 1 tsp | Freshly ground preferred |
| Salt 🧂 | ½ tsp | Diamond Crystal kosher salt |
| Black Pepper 🌶️ | ¼ tsp | Freshly cracked preferred |
| Lemon Juice 🍋 | 1 tbsp | Freshly squeezed for brightness |
| Hot Sauce 🔥 | 1 tbsp | Optional, for spicy variation |
The pickles are non-negotiable—brine-packed dill gives that classic tang. Trader Joe's and Whole Foods carry the best quality, but any jarred dill pickles work. Look for pickles that are firm and still crunchy when bitten—those mushy ones won't hold up in the batter. For the cornmeal, Bob's Red Mill fine grind is ideal, but any fine cornmeal will do. The flour? King Arthur all-purpose is my go-to, but if you're gluten-free, grab a 1:1 GF blend—just make sure it's fine enough to create that crispy texture. The oil matters too—Avocado oil has a high smoke point and stays neutral in flavor, but vegetable oil works in a pinch.
No cornmeal? Crushed cornflakes work in a bind (they'll be lighter but still crispy), but the texture won't be the same. Running low on flour? Cornstarch at half the amount adds crispiness, though it won't bind like flour. For the ranch dip, full-fat sour cream and mayo are key—low-fat versions won't give that creamy, cool contrast. Short on dill? Dried works at one-third the amount, but fresh is always better. The hot sauce is optional, but if you're feeling spicy, Frank's RedHot or Tabasco add a kick without overpowering. Pro tip: Taste the ranch before serving—adjust salt or lemon juice to balance the tang.
Pickles stay fresh in the jar for months, but once cut, they're best used within 3 days for peak crunch. The batter mix keeps dry for 1 week in an airtight container, so make extra if you're hosting. Fried pickles reheat beautifully in the oven at 375°F for 5-10 minutes—just toss them in a single layer to keep them crispy. The ranch dip? It gets better as it sits, so make it ahead and let it chill for at least 1 hour before serving. Store leftovers in the fridge for 3 days, but honestly, they won't last that long.
Why You'll Love This Recipe
- No-Fuss Crunch: I swear, the cornmeal batter clings like a dream—no rolling, no fuss. Just slice the pickles, dip, fry, and you’re done. My lazy Sundays thank me every time.
- Tangy-Creamy Magic: That first bite? The pickles stay crisp outside while melting buttery inside—like a hug for your taste buds. The dill and brine cut through the richness perfectly, so it’s never too heavy.
- Party in a Jar: Honestly, these disappear at gatherings. Serve them as an appetizer with ranch, toss them into a burger, or let your kids dip them in honey mustard. (Yes, even on a Tuesday night.)
- Budget Win: A jar of pickles and a bag of flour stretch for weeks—I’ve fed a crowd for under $10. Plus, they reheat like a champ, so leftovers become my next-day snack without a second thought.
Step-by-step instructions for Toots fried pickles recipe
Here's how to achieve that legendary crispy texture and tangy kick—every bite delivers.
Prep and Coat the Pickles
Start by cutting the 16 whole dill pickles into 1-inch pieces—this size ensures even cooking and maximum crispiness. Drain them well on paper towels to remove excess brine, which prevents proper browning. In a large bowl, whisk together the 1 cup cornmeal, 0.5 cup all-purpose flour, 1 tbsp dried dill, 1 tsp garlic powder, 0.5 tsp salt, and 0.25 tsp black pepper. This blend creates the perfect crunchy crust while infusing flavor.
Toss the drained pickle pieces in the dry mixture until fully coated, pressing gently to adhere. Let them sit for 5 minutes—this resting time helps the coating stick better during frying. For extra tang, add 1 tbsp lemon juice and 1 tbsp hot sauce to the bowl and toss again. The acidity brightens the flavor and balances the richness of the fried coating.
Fry to Golden Perfection
Heat 2 cups vegetable oil in a deep skillet or Dutch oven over medium heat until it reaches 350°F—use a thermometer for accuracy. The oil should shimmer but not smoke excessively. Working in batches (to avoid overcrowding), carefully add the coated pickles to the hot oil. Fry for 3-4 minutes until they turn a deep golden brown and float to the surface. This indicates they're fully crisped and cooked through.
Use a slotted spoon to transfer the fried pickles to a paper towel-lined plate. Let them drain for 2 minutes—this prevents excess oil from making the dip too greasy. Real talk: Don't skip this step. If you rush it, the pickles will be soggy instead of crispy. The goal is that satisfying crunch with a tender center.
Make the Tangy Ranch Dip
In a medium bowl, combine the 0.5 cup mayonnaise, 0.5 cup sour cream, 1 tbsp dried dill, 1 tsp garlic powder, 0.5 tsp salt, and 0.25 tsp black pepper. Mix until smooth and creamy. For extra brightness, stir in the 1 tbsp lemon juice and 1 tbsp hot sauce (if using). Taste and adjust seasoning—you want a balance of tangy, creamy, and slightly spicy. The dip should coat the back of a spoon but remain spreadable.
Melt the 0.5 cup butter in a small saucepan over low heat, then drizzle it into the dip while whisking continuously. This adds richness and helps emulsify the mixture for a velvety texture. Let the dip sit for 10 minutes to thicken slightly—this ensures it clings perfectly to the crispy pickles without being runny.
Serve Immediately for Maximum Crunch
Transfer the fried pickles to a serving platter or individual plates. Spoon the tangy ranch dip into a small bowl or directly onto the platter. Serve immediately while the pickles are still crispy and hot—this is when they're at their best. The contrast of the crunchy exterior and tangy dip is what makes this dish legendary.
For extra flair, garnish with additional dried dill or a sprinkle of black pepper. Pair with a cold beer or a simple arugula salad to cut through the richness. Leftovers? Store the pickles and dip separately—reheat the pickles in the oven at 375°F for 5 minutes to restore crispiness, but know they won't be quite as perfect as fresh.
Pro Tips For Making Toots Fried Pickles
- Drain and Pat Dry: Toots fried pickles need crispy coating, not soggy breading. After draining, wrap the pickles in a clean kitchen towel and press firmly for 2-3 minutes—this removes enough moisture to guarantee a golden crust instead of a greasy mess.
- Use Cold Butter: I learned this the hard way—melting butter first makes the coating greasy and hard to stick. Keep the butter cold and cut it into small cubes. It’ll melt into the oil just enough to add flavor without ruining the texture.
- Double the Cornmeal: The classic recipe calls for equal parts flour and cornmeal, but I skip half the flour. Cornmeal gives that signature crunch, and less flour means less chance of a gummy coating. Trust me, your pickles will thank you.
- Fry in Batches: Crowding the pan drops the oil temperature fast, leading to greasy pickles. Work in small batches—no more than 6-8 pickles at a time—and keep the oil at 350°F (175°C). Yes, it takes longer, but the result is worth it.
Common mistakes when making perfect results
Oil Temp Control
Frying at the wrong temperature is the #1 reason for soggy fried pickles. I can't stress enough how critical it is to maintain 350°F—any lower and you'll get greasy, undercooked pickles; any higher and they'll burn before crisping.
Invest in a thermometer (I use ThermoWorks Thermapen) and check the oil before every batch. The oil should shimmer like a mirror but not smoke excessively. If it's too cool, your pickles will absorb oil like a sponge instead of developing that golden crust. 🌡️
Overcrowding the Fryer
Dumping all the pickles in at once might seem faster, but it drops the oil temperature dramatically, leading to uneven cooking and soggy centers. Fry in small batches—I aim for no more than half the pan's capacity at a time.
Overcrowding also causes the pickles to steam instead of crisp, which defeats the whole purpose. If you're short on time, work in two batches and keep the second batch warm in a 200°F oven while frying the first. This keeps them crispy while you finish.
Skipping the Resting Time
The 5-minute rest after coating the pickles with the cornmeal-flour mix is non-negotiable. This lets the batter adhere properly and prevents it from falling off during frying.
I've seen people skip this step and end up with pickles that look like they're wearing a loose jacket—half the coating falls off when they hit the oil. For extra insurance, give them 10 minutes if you're in a hurry or the humidity is high.
Patience here ensures that crispy texture you're craving. ⏱️
Using the Wrong Pickles
Not all pickles are created equal—sweet pickles or bread-and-butter pickles won't give you that classic tangy kick. Stick to brine-packed dill pickles for the authentic Toots experience. Also, avoid pickles that are too old or mushy—they won't hold up during frying and will turn to mush inside.
Look for pickles that are firm and still slightly crunchy when bitten. If yours are past their prime, soak them in ice water for 10 minutes to firm them up before cutting. Freshness matters for that perfect texture.
Neglecting the Drain Step
Transferring fried pickles straight from the oil to a plate without draining is a rookie mistake. The excess oil makes the dip greasy and unappetizing, and it can even cause the pickles to lose their crispiness as they sit in their own oil.
Always transfer them to a paper towel-lined plate and let them drain for 2 minutes. This also helps them set and keeps the dip clean. Pro tip: Use two layers of paper towels for extra absorption if your kitchen is humid. 🍽️
Reheating Wrong
Fried pickles reheated in the microwave or on the stovetop will turn soggy and rubbery—a tragedy for this dish. The only way to restore crispiness is by reheating in the oven at 375°F for 5 minutes.
Spread them out in a single layer on a baking sheet and watch closely to avoid burning. Even then, reheated pickles won't be as perfect as fresh, so always fry just enough for your immediate needs.
If you must reheat, do it right before serving to maximize that crispy texture. ⚡
Nutrition facts
Frequently asked questions
Can I make these with sweet pickles instead of dill?
The classic Toots recipe calls for dill pickles because their tangy, briny flavor pairs perfectly with the crispy cornmeal batter. Sweet pickles won't give you that same zesty contrast, but if you're set on them, try adding 1 extra tablespoon of lemon juice to the batter for brightness. Just know the texture might be slightly softer since sweet pickles are often firmer.
How do I keep the pickles crispy for longer?
Fried pickles lose crispiness fast, so serve them immediately and keep the oil at 350°F while frying. For leftovers, store them in a single layer on a wire rack in the fridge (not airtight) for up to 2 hours. Reheat in the oven at 375°F for 5 minutes—never microwave! For parties, fry in batches and keep the second batch warm in a 200°F oven while finishing the first.
What's the best dipping sauce alternative to ranch?
While ranch is classic, try these crowd-pleasers: Blue cheese dressing (rich and tangy), spicy mayo (mix mayo with hot sauce), or aioli (garlic-infused). For a lighter option, blend Greek yogurt with lemon juice and herbs. Pro tip: Add 1 teaspoon of pickle brine to any dip to enhance the tang!
Can I bake these instead of frying for a healthier version?
Toss the coated pickles in 1 tablespoon of oil (instead of frying) and bake at 425°F for 12-15 minutes until golden. They'll be lighter but still crispy. For extra crunch, sprinkle with crushed cornflakes before baking. Just note they won't be as crispy as fried—think "crunchy" vs. "crispy."
Why did my pickles turn out greasy instead of crispy?
Greasy pickles usually mean one of two things: oil was too cool (below 350°F) or they weren't drained long enough after frying. Always use a thermometer and let fried pickles rest on paper towels for 2 full minutes. Overcrowding the fryer also drops oil temp—stick to half the pan's capacity per batch.